
Online protection minimizes the risk of hackers, malware attacks, and other threats to your Internet accounts and online activities. DNS over HTTPS or DoH is one example of reliable security and privacy features that offer encrypted privacy support on Windows 11 computers.
Back on Windows 10, DNS over HTTPS is not easily accessible to users, but Microsoft made it possible with the new Windows 11 operating system. This new connectivity feature is now fully supported in the upcoming versions of Windows OS. You can change and enable DNS-over-HTTPS to use a more safe and private protocol to encrypt and keep your online activity secured on your web browser or other apps.
DNS over HTTPS works by encrypting the route that your data requests go through to reach the DNS server when you want to access a website. It will make sure that no attacks or threats will be able to disrupt the flow. It will also avoid redirecting your requests to dangerous websites, a common problem experienced by users with regular DNS connection protocols.
How to Change and Enable DNS over HTTPS for All Apps in Windows 11 PC
There are several ways to turn on the DNS over HTTPS feature and enable it for use on all your apps and software on a Windows 11 PC. Check each method below and see which procedure is better for you to use.
#1 – Turn On DNS over HTTPS via Registry Editor

- Run the Registry Editor. You can use the search box or open the Run dialog box and enter regedit.
- Go to HKEY_LOCAL_MACHINE\SYSTEM\CurrentControlSet\Services\Dnscache\Parameters.
- Go to the right side and right-click on an empty space.
- Click New.
- Select DWORD (32-bit) Value.
- Rename it EnableAutoDoh.
- Double click the EnableAutoDoh entry to open it.
- Set the Value Data to 2.
- Restart your Windows 11 PC.
#2 – Enable DNS over HTTPS via Network Settings
- Navigate to the Settings menu.
- Go to Network & Internet.
- On the right side, select Properties.
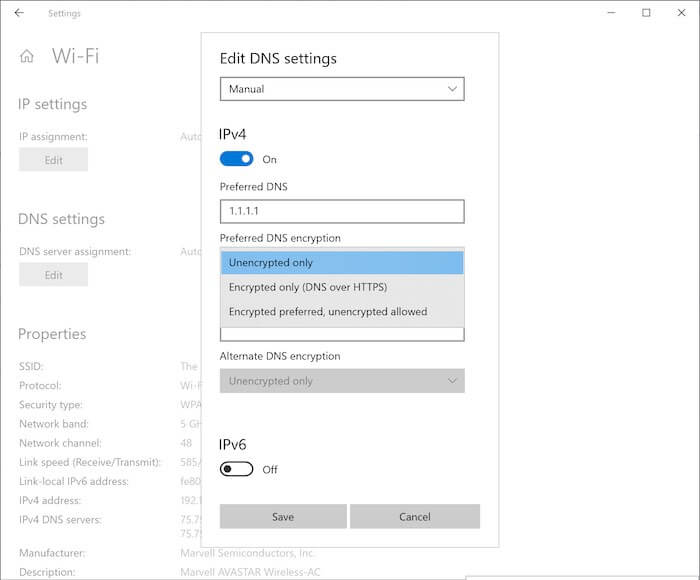
- Look for DNS server assignment and click the Edit button.
- You will see a drop-down menu on the top. Click the down arrow to open the menu and select Manual.
- Go to Preferred DNS encryption and choose Encrypted only (DNS over HTTPS).
- Go down to Alternate DNS encryption and select Encrypted only (DNS over HTTPS).
- Click the Save button.
How to Check If DNS over HTTPS is Working
You can verify if the DNS over HTTPS is on or not by doing these steps.
- Launch the Settings menu.
- Navigate to Network & Internet.
- Select Properties.
Look for the DNS value and check if there is the word Encrypted next to the address.
Was the article helpful? We would love to know your thoughts. You can write to us in the comments below.