
Windows is pre-installed with hundreds of processes made to keep your PC running smoothly. However, this usually leads to compatibility problems when installing new applications or programs.
In this case, it often leads to delays, freezing issues or system breakdowns. To restore it near default factory condition, you can try to reset your computer, but the best choice is still to restart and perform a clean boot process that will allow you to hide or disable unnecessary Microsoft services. After restarting your device, you can enable or reactivate these system services and system configuration one by one troubleshooting it until you find the issue responsible for the errors.
In this tutorial, you will learn how to restart and do a clean boot correctly with Windows 10 PC to troubleshoot and determine which software is causing conflicts on your computer.
What You Need to Know Before Performing a Clean Boot to Restart & Disable Microsoft Services

What’s ideal about a good operating system is that you can install as many programs and load system services as you want. If you run Windows 10 normally, it will start with a number of additional programs and services that you have added, and even if things go well overall, you may encounter a software conflict at some point.
If you find that Windows 10 does not work properly, or if an official update of Windows 10 is not installed correctly, it is always a good idea to look for software conflicts by clean booting Windows. If you start Windows correctly, you will be able to remove the culprit and make the necessary changes.
Before doing a clean boot, there are some things you need to know. To access these settings, you need to connect to your computer with administrator rights. This shouldn’t be a problem if you are using your own device, but when you are at work, you may need to talk to the system administrator.
Once you have started performing a clean boot your own PC, don’t worry if it doesn’t work the way you remember it. This state is used to solve problems, and after that the computer will be restored to a normal state.
Will a Clean Boot Remove My Files and Backups?
No, this is not the case, but we strongly recommend that you back up important files before performing a clean boot. Things can go wrong, so prevention is better than cure! With an external storage device or cloud computing solution, you can protect your important data from irreversible loss.
Safe Mode vs. Clean Boot
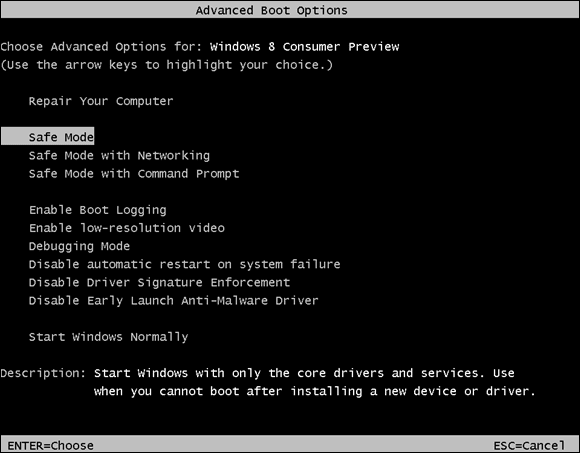
A popular method of troubleshooting and diagnosing a PC is to switch to Safe Mode. Safe Mode loads Windows with a minimum number of drivers. For example, when you run in Safe Mode, Windows only loads the standard VGA video driver. For this reason, when you run in Safe Mode, the resolution of your PC is set to very low.
A Clean Boot is a bit different from a Safe Mode. When doing a clean boot, Windows starts up normally, but without applications and services in the background that are not supplied by Microsoft. It is these background applications and services that make Windows behave the way it does. Most people don’t know that these items run on Windows.
Running Windows with a clean boot is very easy. All you have to do is temporarily disable all non-Microsoft services and reboot your PC. When it starts up, only the Microsoft services run, so you can activate the various services until you find the problem or the offending program.
To Perform a Clean Boot Process in Windows 10 PC
Before performing a clean process to boot Windows, it is highly recommended that you create a System Restore point if something goes wrong.
To clean boot your system in Windows 10 (also applies to Windows 8), do the following:
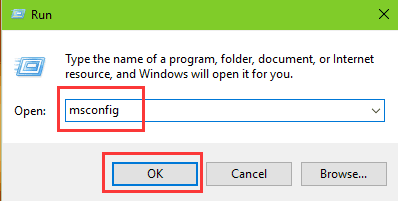
- Click the Windows + R button to open the Run window.
- Now type msconfig and click OK or press Enter.
- On the General tab, click Selective startup.
- Clear the Load startup items check box.
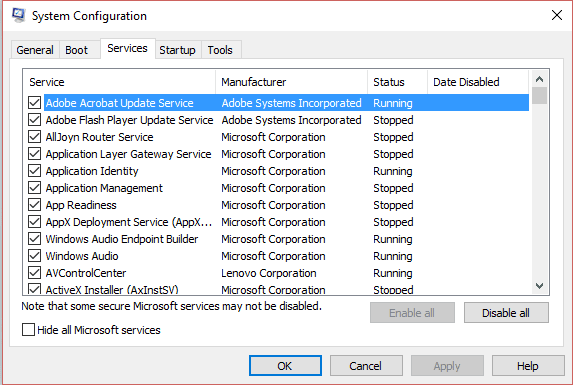
- Click the Services tab.
- Select the Hide all Microsoft services checkbox.
- Click the Disable All button.
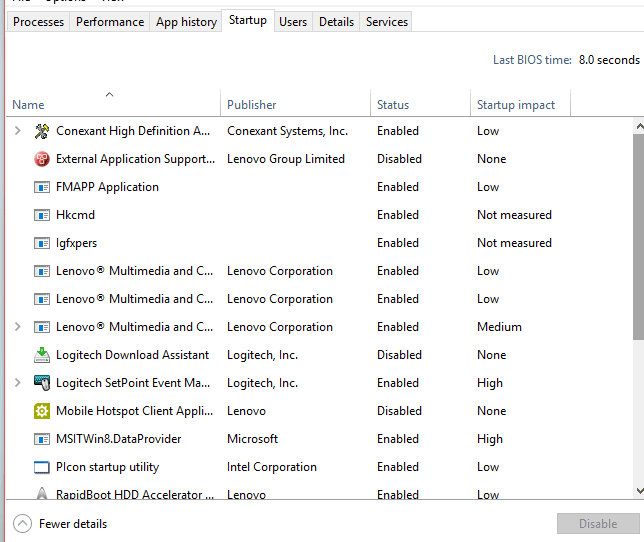
- Click the Startup tab.
- Click Open Task Manager.
- On the Startup tab, right-click on each activated startup item and select Disable.
- Click OK.
- Click Restart.
You can now proceed to troubleshooting the problems that have arisen before. If you receive error messages indicating that certain programs cannot be started, this is normal because you have disabled all irrelevant services.
When the clean boot fixes the problem, you can start enabling the services and running the applications back and rebooting the computer. We recommend that you do this one service at a time, or one application at a time, even if the process takes some time. This allows you to narrow down the scope of the problems through the troubleshooting process.
When you’ve finished troubleshooting, go back to the Services tab in msconfig, click the Enable All button, and then separately disable any services that caused the problem. In the Task Manager, enable all running applications that did not cause problems.
When you have finished troubleshooting, restore the system by following these steps:
- Click the Windows + R button to open the Run window.
- Enter msconfig and click OK.
- On the General tab, select Normal startup.
- Click the Services tab.
- Clear the Hide all Microsoft services check box.
- Click Enable All.
- Click the Startup tab.
- Click Open Task Manager and enable all of your startup programs.
- Click OK.
- Click Restart.
NOTE: Make sure you “Enable all Microsoft services” after troubleshooting and enable all programs on the Startup tab, or lose some operating system features (e.g. an Internet connection) and some applications do not boot at startup.
Conclusion
Clean Boot is designed to resolve software conflicts by disabling some third-party programs, services and drivers during the boot process. Note that this process can also be used to resolve conflicts in Windows 8.1 and Windows 7.
If the problem persists, you can also run Windows in Safe Mode to troubleshoot additional issues and determine the cause of the problem. Typically, Safe Mode can help you diagnose boot problems and problems with your wired or wireless network adapter. It is also recommended that you run a virus scan.