
If you have monthly subscriptions and memberships, you can spare yourself the hassle of overlooking paying for it when you apply for an automatic payment agreement. Each month, your bank or payment service will automatically deduct your scheduled monthly fees, so you do not have to worry about it.
PayPal offers automatic payments, making it easier for you to authorize and pay your bills as well as manage subscription for supported services fees each month. Recurring payments prevent late settlements and minimize the effort on your part in managing all your monthly bills. However, if you need to cancel an automatic recurring payment agreement you have set up on your PayPal for business or personal account, you can always do so easily.
One of the reasons people remove their reapproved recurring payments on their Paypal accounts is when they no longer need to continue the service and cancel their subscription. To stop payments and avoid continuously paying for a canceled membership, you also must stop the automatic payment. In some cases, users may have insufficient funds in their PayPal account. If you change your account information or payment details, you also need to cancel the automatic and recurrent payment billing agreements.
Steps to Stop or Cancel Automatic Subscriptions, Manage Recurring Payments on your PayPal Account
Applying for the automatic recurring payment on PayPal is easy through the Paypal website on your mobile phone or computer or using the mobile app. But, it also takes only a few steps to cancel your current recurring subscriptions and billing arrangements. Let’s check out the method below.
Managing Authorized Billing Agreements and Recurring Payments using the PayPal Website

- Launch any browser on your device and go to PayPal.com.
- Login to your account.
- Go to the upper right corner and click the Gear icon to open your account settings.
- Head over to the Payments tab.
- Select Manage automatic payments.
- Under the Automatic Payments section on the left side, click Show active. All your current recurring payments will appear.
- Look for the account that you want to cancel and click it.
- On the right side, go to the Status section.
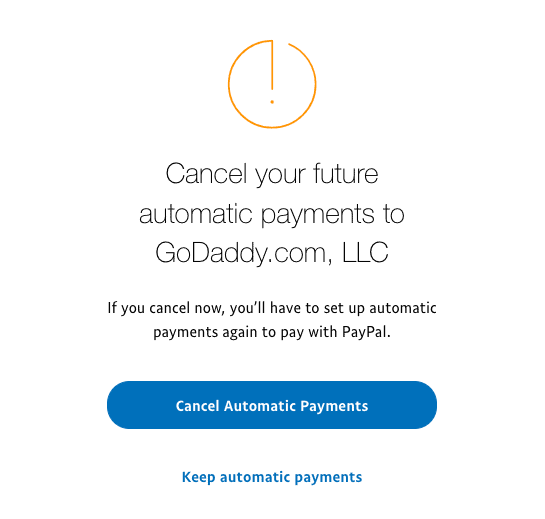
- Click the Cancel button.
- A confirmation message will appear. Select Cancel Automatic Payments.
How to Cancel or Remove Preapproved Payments using the Paypal Mobile App
- Launch the Paypal mobile app on your phone and sign in to your account.
- Now, Tap Wallet.
- Then, scroll down to the bottom of your screen and hit Preaaproved payments.
- Select the merchant from the Automatic payments list to view or update your details.
- Finally, hit “Remove PayPal as your payment method” at the bottom of the screen.
That’s it! Follow the steps below to help you manage all your automatic payments on PayPal. What are your reasons for stopping your recurring payments? We value your opinion, so please drop one below.