
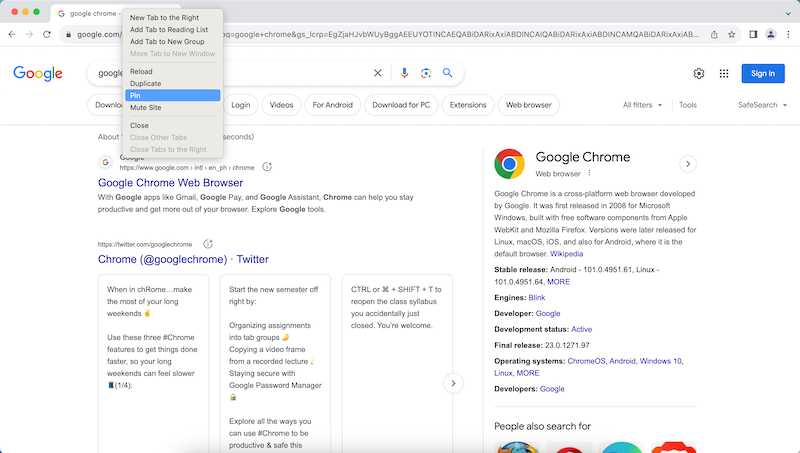
Chrome’s pinned tabs offer an invaluable tool to quickly find frequently used tabs. They stay put in the left area of your tab bar. You’ll see them every time you open Chrome.
But sometimes, snags happen, and your tabs might stop working. This could be due to settings, extensions, or even messed-up files.
Ways to Fix Chrome Pinned Tabs Not Loading or Auto-Restored on Startup Error
But don’t worry! Here’s how to untangle the issue on Google Chrome and get your pinned tabs back on track:
Check Your Startup Settings on Google Chrome
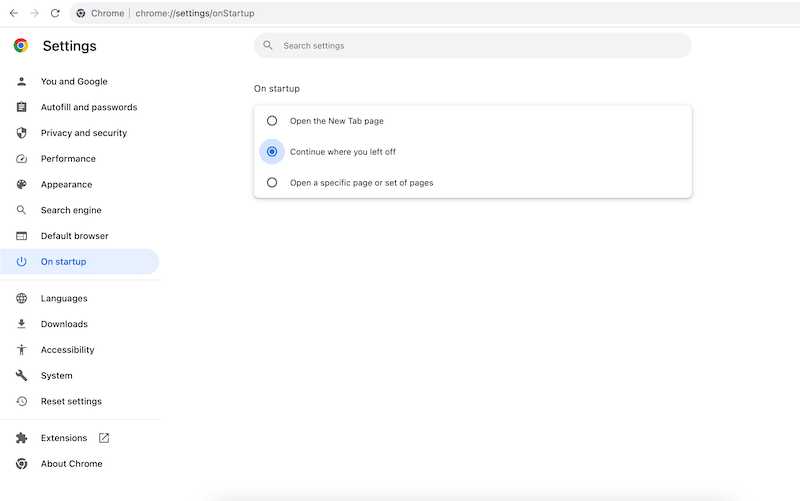
Incorrect startup settings are a common culprit. To make sure pinned tabs return with other tabs, follow these instructions:
- Open Chrome; click the Menu icon (with three vertical dots) in the top right.
- Locate Settings, then scroll until you see On startup.
- Choose “Continue where you left off.”
Now, your pinned tabs should be back.
Disable or Update Your Google Chrome Browser Extensions
Another possibility is that extensions might be meddling with your pinned tabs. You can disable or update your extensions to see if that resolves the problem. Here’s how:
- Launch Chrome, then find the Menu icon in the top right.
- Go to More tools > Extensions.
- Deactivate an extension by flicking the switch next to its name.
- If there’s an Update button next to an extension, click it.
Give these fixes a shot, and your pinned tabs should be back in working order.
Remember, pinned tabs keep life organized in Chrome. They’re worth fixing!
Don’t let settings or extensions stand in your way. Follow the easy steps above, and your pinned tabs will return, good as new.
Uninstall and Reinstall Google Chrome Browser
If other fixes don’t work, you may need to give Chrome a fresh start. This could mean uninstalling and reinstalling the browser. This step might fix any messed-up or outdated files causing issues. Here’s the process step by step:
- First, uninstall Chrome from your device. It’s important to check the box to remove browsing data. This will delete your bookmarks, history, passwords, and settings in Chrome. It’s a fresh start.
- Next, reinstall Chrome from here. Sign in with your Google account. This will sync your data back to Chrome so you don’t lose a thing.
- Finally, pin your tabs anew. To do this, right-click on them and pick “Pin tab.”
To sum it up, pinned tabs in Chrome are a handy tool. They help you stay on target and save time. But when they stop loading or don’t come back at startup, it’s maddening.
Don’t worry though, the solutions listed above should get you out of this pickle and have those pinned tabs back up and running.
Using the steps above, your pinned tabs will spring back and continue to help you with smooth and easy browsing. Do remember to re-pin your tabs post-reinstallation to enjoy the convenience they offer.
If you have other questions, or if there’s anything else you’d like to tell us, we’d love to hear it. Trust these solutions are helpful. Enjoy the handiness of pinned tabs once more!