
DtsApo4Service.exe is a part of the DTS Sound system, a program that enhances audio performance on your computer. It operates quietly in the background, managing sound processes to deliver a richer audio experience.
Occasionally, this executable may encounter issues, but they are typically resolved with a few troubleshooting steps.

How to Troubleshoot and Fix Issue with DtsApo4Service.exe Stopped Working or Keeps Crashing on PC
Disable DtsApo4Service.exe from Startup
DtsApo4Service.exe is designed to start automatically when you boot up your computer, as it’s part of the DTS Sound system that manages your audio settings.
However, if you’re encountering problems with it, stopping it from launching at startup might help. This doesn’t uninstall the program; it simply remains inactive until you choose to activate it again.
- To disable DtsApo4Service.exe from starting up, you’ll need to access the Task Manager.
- You can do this by pressing Ctrl + Shift + Esc on your keyboard.
- Once the Task Manager window is open, click on the ‘Startup’ tab, which will show you a list of all the programs that start when your computer boots up.
- In the ‘Startup’ tab, scroll through the list until you find DtsApo4Service.exe.
- Click on it to highlight it, then select the ‘Disable’ button in the bottom-right corner of the window.
- This action will prevent DtsApo4Service.exe from starting up with Windows, which could resolve some of the issues you’ve been experiencing.
It’s worth noting that disabling DtsApo4Service.exe might affect certain audio enhancements provided by the DTS software. Your system’s basic sound functionality will remain, but some specific features that rely on the DTS service may not be available until you enable the service again.
If your audio experience feels lacking without these enhancements, you can easily reverse the process by going back into the Task Manager and clicking ‘Enable.’
Update DTS Sound Software
Keeping your software current is crucial for ensuring everything works smoothly. Outdated software can lead to a mismatch with your system, causing errors and glitches. To keep your audio crisp and clear, updating your DTS Sound Software is a smart move.
Here are the steps to update your DTS Sound Software:
- Visit the official website of your computer’s manufacturer or the DTS Sound software provider.
- Look for the ‘Support’ or ‘Downloads’ section on the site.
- Find the latest version of the DTS Sound Software compatible with your Windows version.
- Click on the download link for the software and wait for the download to complete.
- Once downloaded, open the installer and follow the on-screen instructions to complete the update.
- After the installation, restart your computer to apply the changes.
By following these steps, you ensure that the DTS Sound Software is up to date, potentially resolving any existing issues and improving your computer’s audio performance.
Reinstall DTS Sound Software
There are times when a simple reset is what’s needed to get things working again, and the same goes for software. If DtsApo4Service.exe is giving you trouble, removing the current installation of DTS Sound Software and starting fresh could be the solution. It’s like clearing out clutter that’s causing your app to stumble.
- To begin, you’ll want to remove the existing DTS Sound Software.
- This is done through the ‘Programs and Features’ section in your computer’s Control Panel, where you can find the software listed and choose to uninstall it.
- It’s a straightforward process: select the software, click ‘Uninstall’, and the system will guide you through the removal.
- Once the old version is removed, it’s time to get the latest one.
- Head over to the official DTS Sound Software website or your PC manufacturer’s support page to download the newest version.
- Make sure you’re getting the right software for your specific system to avoid any compatibility issues.
- With the new version downloaded, run the installer.
- It will walk you through the steps to get the software up and running again.
- This fresh installation can iron out any wrinkles that are causing errors, giving you a clean slate.
Reinstalling might seem like a bit of a chore, but it’s often an effective way to deal with stubborn software problems. It’s like a fresh start, not just for your software but for your audio experience as well.
Conduct a Malware Scan
Sometimes, files that seem harmless can be wolves in sheep’s clothing, and that includes DtsApo4Service.exe. It’s a legitimate part of your audio software, but in rare cases, malware can masquerade under this name. To clear any doubts, a thorough malware scan is a good step.
Choosing a trustworthy antivirus program is like picking a good doctor; you want something that’s thorough and reliable. Run a full system scan with the antivirus software to check every nook and cranny of your computer. This process might take some time, but it’s important for your digital health.
If the scan does find something suspicious with the DtsApo4Service.exe file, the antivirus will typically offer to remove or quarantine the offending item. Follow the prompts provided by your antivirus software to deal with any threats. It’s a bit like taking out the trash; you’re just getting rid of what doesn’t belong.
Update or Reinstall Sound Drivers
Sound drivers are the translators between your computer’s hardware and its software; they’re essential for your system to produce sound correctly. If DtsApo4Service.exe is acting up, it could be due to outdated or corrupt sound drivers.
Keeping these drivers up to date is key to maintaining a harmonious relationship between your system’s audio capabilities and the software that enhances them.
- To update your sound drivers, you’ll want to open Device Manager, which you can find by searching for it in the start menu or by right-clicking on ‘This PC’ and selecting ‘Manage’.
- Once you’re in Device Manager, expand the ‘Sound, video, and game controllers’ section.
- Here, you’ll see a list of audio devices and their drivers.
- Right-click on the audio device corresponding to your DTS software and select ‘Update driver.’
- You’ll be given the option to let Windows search for the best driver or to browse your computer for driver software.
- If you’ve already downloaded the latest driver from the manufacturer’s website, choose to browse your computer for the driver software and select the downloaded file to install.
Sometimes, an update isn’t enough, and a complete reinstallation of the sound drivers is necessary.
In this case, you would right-click on the device in Device Manager and choose ‘Uninstall device’. Don’t worry; your computer won’t lose audio capability permanently. After uninstalling, restart your computer. Windows will attempt to reinstall the sound driver during the startup process.
If you prefer a more hands-off approach, there are dedicated tools available that can manage driver updates for you. These programs scan your system for outdated drivers and automatically download and install the latest versions.
It’s a convenient option if you’re not comfortable navigating Device Manager or if you want to keep all your drivers updated without much fuss.
Run the Playing Audio Troubleshooter
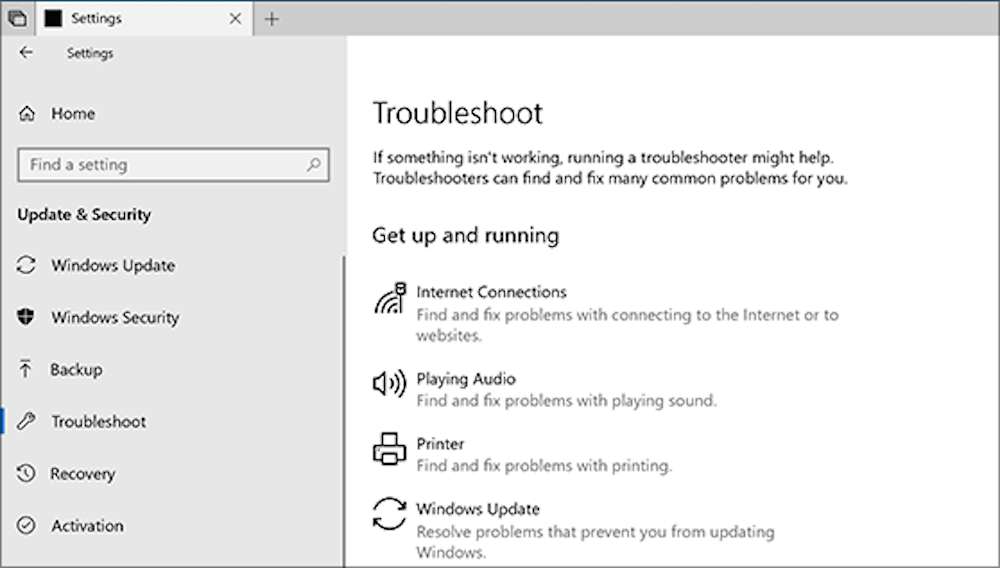
Windows comes with various troubleshooters designed to diagnose and automatically resolve various computer problems quickly. The Playing Audio troubleshooter is specifically tailored to fix sound issues, which can be handy if you’re having trouble with DtsApo4Service.exe.
Here’s how to run the Playing Audio troubleshooter:
- Open the Start menu and click on the gear icon to open Settings.
- In the Settings window, go to Update & Security.
- From the left-hand menu, select Troubleshoot.
- Click on ‘Playing Audio’ and then select ‘Run the troubleshooter’.
- The troubleshooter will now scan for audio-related issues. Follow any on-screen instructions to allow the troubleshooter to resolve problems.
- If the troubleshooter finds any issues, it will ask for your permission to apply the fix. If it doesn’t find anything, it may offer additional troubleshooting options.
Running the troubleshooter is a proactive step that can save you a lot of time. It’s designed to handle common sound issues without requiring you to dive into technical details.
If the troubleshooter manages to resolve the issue, it saves you the effort of manual troubleshooting. If it doesn’t, you’ve at least ruled out some of the basic issues and can move on to more in-depth solutions.
Uninstall DTS Audio Processing Software
If all other troubleshooting avenues have been exhausted, removing the DTS Audio Processing Software entirely may be the next step. This is typically reserved as a last resort, but it can effectively clear up persistent issues that have resisted previous fixes. It’s a bit like deciding to clear out a garden overrun with weeds so that you can start afresh.
Uninstalling the software is straightforward and involves a few steps within the Control Panel.
- You’ll want to navigate to the Control Panel, which can be accessed through the Start menu or by searching for it directly.
- Within the Control Panel, there’s a section labeled ‘Programs’ or ‘Programs and Features’, where you can find a list of all installed software on your computer.
- Locate the DTS Audio Processing Software in the list.
- It may be listed as ‘DTS’, ‘DTS Sound’, or something similar.
- Once you find it, click on it to select it, and then you’ll see an option to ‘Uninstall’.
- Clicking this will initiate the uninstallation process, and you may need to follow a few prompts to complete the action.
- Some software installations also come with their own uninstaller, usually found in the same folder where the software is installed.
- If you choose to use the uninstaller file, double-clicking it should launch a wizard that will guide you through the removal process.
- After the software has been removed, it’s a good idea to restart your computer. This ensures that all changes take effect and that any residual files are properly cleared out.
With the software uninstalled, your system is now a clean slate, free from the issues that the DTS software may have been causing. If you need the software again, you can always reinstall the latest version from the official source.
Conclusion
Technical glitches with software like DtsApo4Service.exe are not uncommon, and when they occur, it’s reassuring to know there are several solutions to try. Work through the suggested fixes, one at a time, until you find the one that resolves your issue. It’s a systematic approach to problem-solving that often yields results, restoring your system’s audio functions to their optimal state.