
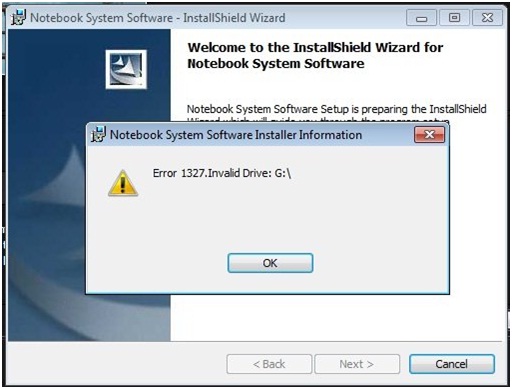
Installing a program is easy but can be frustrating when you encounter errors. For instance, attempting to install Adobe, Kaspersky, or a Microsoft Office may lead you to Error 1327 Invalid Drive. This simply means that the current drive you are installing your software to is not working.
Reasons Why You Experience Error 1327 – Invalid Drive
There are different reasons why you see the Invalid Drive Error 1327.
- Your registry references and network drive are no longer connected.
- The Reconnect at Logon check box of your network drive is checked and a system folder is mapped to the drive.
- Your registry key may include incorrect values.
- You accidentally changes the dirve letter of your DVD drive.
- The System Registry is pointing to a temp drive.
If you encounter the Error 1327 – Invalid Drive, check out the methods below to find out how to fix the problem.
Method 1 – Remove the Drive Letter
- Go to Start and click Run. You may also press the Windows key + R simultaneously.
- On the search bar, type cmd and click OK.
- Next, type subst /P (P is the Driver Letter;add your Drive Letter) and press Enter.
- Type exit to close the Command Prompt. Install the program.
Method 2 – Link the Drive Letter to a Temporary Location
- Press Windows key + R simultaneously to open the Command Prompt.
- Type cmd and press Enter.
- Next, type subst [Driver Letter]: C:\temp. Press Enter.
- Type exit to close the command prompt and press enter.
- You may now reinstall your program.
- Open the Command Prompt again.
- Type cmd and press Enter.
- Next, type subst /D [Driver Letter]: and press Enter. This will remove the temporary association of the software.
Method 3 – Disconnect Your Network Drive
Check if the network drive appears in This PC to perform this solution. If the drives appear, follow the steps below:
- Click Start and choose Programs.
- Next, go to Windows Explorer and select Tools.
- Click Disconnect Network Drive.
- Look for the network drive and click OK.
- Go to back to Tools and look for Map Network Drive. Click to open.
- Look for the Reconnect at Logon and uncheck the box.
- Type the path of the shell folder and click OK.
- Reboot your Computer and install the application.
Method 4 – Modify Your Registry
Before you attempt to change your registry, make sure to back it up in case a problem may occur.
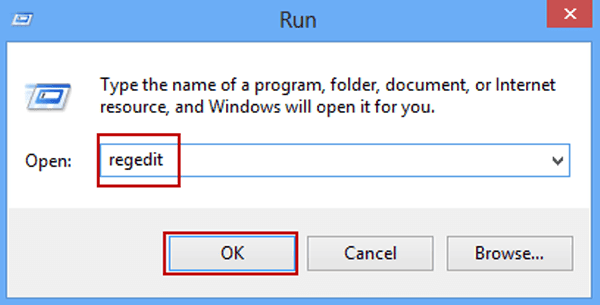
- Press Windows key + R to open Run.
- On the command prompt, type regedit and click Enter.
- In the Registry Editor, look for HKEY_CURRENT_USER\Software\Microsoft\Windows\CurrentVersion\Explorer\Shell Folders.
- Check the values labeled Data for every entry. If there are drive letters that are not in your computer, type c:\my documents in the Value box and click OK.
- After editing the value box, the same process for other registry keys. Locate the following keys in the registry editor one at a time and edit the value box of drive letters that are not in your computer.
HKEY_CURRENT_USER\Software\Microsoft\Windows\CurrentVersion\Explorer\User Shell Folders
HKEY_LOCAL_MACHINE\SOFTWARE\Microsoft\Windows\CurrentVersion
HKEY_LOCAL_MACHINE\SOFTWARE\Microsoft\Windows\CurrentVersion\Explorer\Shell Folders
HKEY_LOCAL_MACHINE\SOFTWARE\Microsoft\Windows\CurrentVersion\Explorer\User Shell Folders
- Once done, close the registry editor and install the program again.
Final Thoughts!
Are the methods above helpful? Let us know which method works for you. Fix the Error 1327 so you can successfully install and use programs that you need.