
You’re stuck in a very strange situation. Your slideshow isn’t working properly. You put all that time into organizing your pictures, and now you’re getting frustrated.
Nothing you do seems to solve the problem, and it’s only making you angrier by the minute.
Calm down, take a deep breath, and realize we got your back.
However, the solution to your problem is far less complicated than you might realize. So, put on some relaxing music, get yourself a refreshing drink, and let’s solve this problem with your Windows 11 PC lock screen slideshow working once and for all.
Methods to Resolve Windows 11 PC Lock Screen Slideshow Not Working Issue
Are you in a hurry? If so, take a look at these solutions and jump straight to it:
- Allow Indexing for Image Files
- Activate Slideshow Feature on Windows 11 Lock Screen
- Turn on Slideshow Function in Power Settings
- Inspect the Images in the Slideshow
- Reinsert the Folder of Slideshow Images
- Activate Lock Screen Slideshow via Group Policy Editor
- Configure the Lock Screen to Remain On Post-Slideshow
Those of you who have a little more time, read below and see if these solutions work for you.
1. Allow Indexing for Image Files
- Use the Windows Search bar and type in Power Option.
- You’ll then need to click on Change advanced power settings.
- Then Desktop background settings option and go to Slide show option and change the settings to Available.
2. Activate Slideshow Feature on Windows 11 Lock Screen
- Hit the Win + I key combination.
- You’ll then want to Personalization and go to Lock screen.
- That’s where you can set the Lock screen status, and you’re ready to go.
3. Turn on Slideshow Function in Power Settings
- To find power options in your Windows operating system, type “power options” in the search bar and hit Enter. This will bring up the Power Options menu, where you can change your power settings.
- Once the menu opens, look for the “Edit Power Plan” option and click on it. This will take you to a window where you can customize your power plan in more detail.
- To get access to the advanced settings, click on the “Change advanced power settings” link. In the advanced settings window, you’ll see various options.
- To adjust your desktop background settings, locate and expand the “Desktop background settings” option.
- Within that section, you’ll find the “Slide show” option, which you can expand as well.
- Now you want to make changes to the slide show settings, look for the “Settings” option and set it to “Available” to enable it.
4. Inspect the Images in the Slideshow
Make sure that the folder containing the images for the Lock Screen Slideshow is still present and hasn’t been unintentionally deleted. Double-check that the folder is in its designated location and hasn’t been moved or removed by mistake. Sometimes the folder gets deleted, and that’s when the real trouble begins.
5. Reinsert the Folder of Slideshow Images
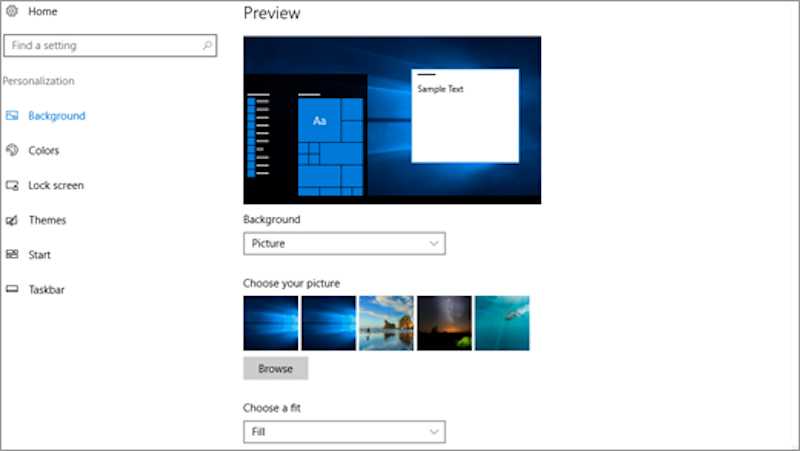
- If you want to access the lock screen settings, press Win + I to open Settings, then go to Personalization > Lock screen.
- Click the down arrow on the “Personalize your lock screen” tile.
- To remove the set folder, click “Remove.”
- To select a new folder, click “Browse” and choose the desired folder.
- After you’ve done everything, check to ensure everything is working properly.
6. Activate Lock Screen Slideshow via Group Policy Editor
- If you want to access the Windows Group Policy Editor, you’ll need to open the Run dialog (Win + R) and enter “gpedit.msc.”
- In the Group Policy Editor, navigate to Computer Configurations > Administrative Templates > Personalization.
- Double-click on “Prevent enabling lock screen slide show” and select “Not Configured” as the option.
- Click OK and restart your PC for the changes to apply.
- You’ll need to restart your PC, or the changes won’t go into effect.
7. Configure the Lock Screen to Remain On Post-Slideshow

- Use this only if you want to customize your lock screen; open the Settings menu by pressing Win + I, then go to Personalization and select Lock screen.
- Look for the “Personalize your lock screen” tile and click the down arrow next to it.
- To remove the current folder, click on the “Remove” button.
- If you want to choose a new folder, click on the “Browse” button and select the desired folder again.
Wrapping Up!
Troubleshooting the Windows 11 PC lock screen slideshow not working issue can be resolved by following these simple steps. The problem you’re facing isn’t uncommon, and there’s no reason to be alarmed.
If none of this works, have a professional look into it because you might have registry issues.