
Windows Defender is a very useful tool provided by Microsoft to protect users against viruses and all different types of Malwares. However, it has been well noted that the anti-virus software is a resource hog especially when it comes to CPU usage.
Fortunately, Windows made it easy for users to set the maximum CPU usage of Defender in Windows 10 when it is running scans. In this post, we will show you the different ways on how to implement this process.
How Much CPU Resources Does Windows Defender Really Use?
By default, the built-in Microsoft Windows Defender antivirus application is set to have a maximum CPU usage of 50% when running antivirus scan. However, you can limit this to the maximum number of defaults in Windows 10 so that it never overloads the processor.
3 Ways to Limit Maximum Windows Defender CPU Usage in Windows 10:
Limit Windows Defender CPU Usage using the PowerShell

Utilising PowerShell is the easiest way to set the CPU limit for Windows Defender. All you have to do is run a single command prompt, and that’s it.
- First, click Start, find PowerShell, right-click on the result, and then click Run as Administrator. This action opens the elevated PowerShell prompt.
- In the PowerShell window, run the following command by replacing with a valid percentage from 10 to 100. For example, if you want to limit CPU usage to 25%, enter 25.
Set-MpPreference -ScanAvgCPULoadFactor <percentage>
You will not see any confirmation, but you can be sure that Windows Defender will limit the use of the processor according to the above command.
If you want to reset the settings, simply run the above command and replace the <percentage> with 50 percent. 50 percent is the default limit on the use of the Windows Defender processor, as I mentioned earlier.
Set Windows Defender Maximum CPU Usage using Group Policy
You can also use Group Policy to set the CPU percentage limit for Windows Defender scan. If you are using Windows 10 Pro, Enterprise, or Education Edition, you can use the Local Group Policy Editor to configure GUI settings. Otherwise, you can make changes to the registry.
- Simultaneously press Win + R on the keyboard and type: gpedit.msc.
- Press the Enter key.
- The Group Policy Editor opens.
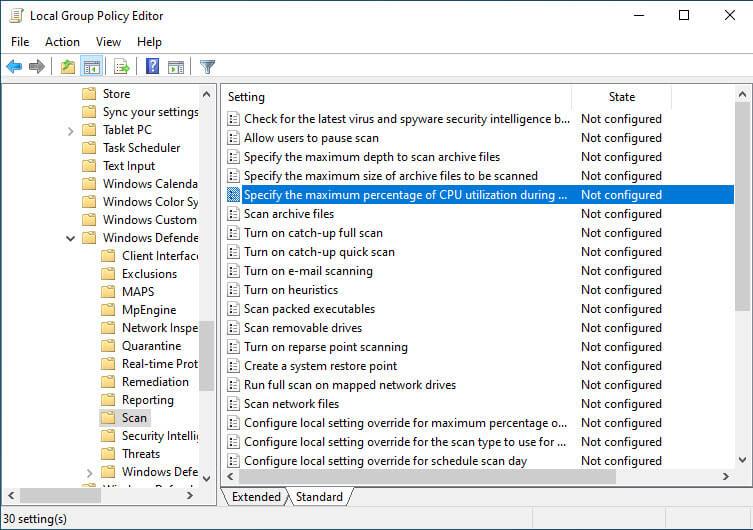
- Navigate to the computer configuration/administration templates/Windows Components/ Microsoft Defender Antivirus/Scan.
- Double right click on Specify the maximum percentage of CPU usage during scanning in the scan policy field.
- Activate this policy.
- In the Options field, enter the percentage of CPU you want to use.
- Click Apply and OK.
Limit Windows Defender Max CPU Usage via Registry Editor
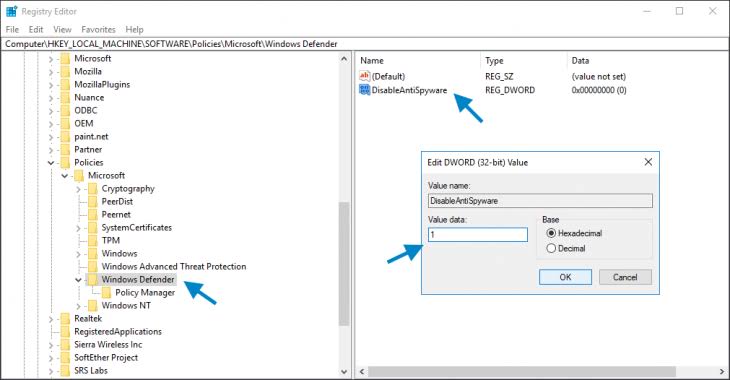
- Open the Registry Editor and go to: HKEY_LOCAL_MACHINE\SOFTWARE\Policies\Microsoft\Windows Defender.
- Right-click on the Windows Defender button and select New -> Key. Give it a name: Scan.
- Then right-click on the newly created scan subkey and select New -> DWORD (32-bit) value.
- Name DWORD AvgCPULoadFactor, then double-click it to set the maximum percentage of processor for Windows Defender.
- Close the registry editor.
- Reboot your computer and make sure if Windows Defender is still running at high CPU usage.
Pro Tip: Disable Sample Submission in Windows Defender
Microsoft automatically collects samples of Windows Defender files to improve protection against viruses and malware and improve Windows Defender. Microsoft also collects information about suspicious items detected by Windows Defender on your computer to provide protection in the cloud. You can disable automatic sample submission by simply typing “Send Sample” in the search box and clicking on “Virus and Threat Protection” to further reduce CPU utilization.
- Now click on “Virus and Threat Protection Settings”.
- Scroll down to the virus and threat settings to find “Automatic Sample Submission” and turn the switch to the Off position to turn it off.
Conclusion
As you can see, it is quite easy to limit Windows Defender from consuming all of your CPU resources. If you are stuck or need help, please comment below.