
Google Docs makes it easy for users to create and store documents online. This application is free with your Google account. You can edit documents easily with the default settings automatically applied.
Still, there are instances when you want to set your own default formatting. While Google Docs offer a specific format, manually editing these formatting takes time. Therefore, changing these default formats to your desired elements will automatically change the setting to how you want it to be.
If you use the same settings for all your documents, you will maximize your time and effort when you change the default settings. To do that, follow these steps below:
Method 1 – Change Normal Text Default Settings
If you are using the same font style and line spacing for most of your files, change it automatically so you would not have to edit everytime you create a new document.
- Open your Google docs. Choose a blank file or you can open from your existing saved documents.
- Either write a paragraph or highlight existing sentences from your document. Adjust the font style and line spacing according to what you want.
- Highlight your sentences. You can do this by holding down your mouse from the beginning of your sentence and dragging it to the end. If you have 1 paragraph and you want to highlight everything, press Ctrl+A.
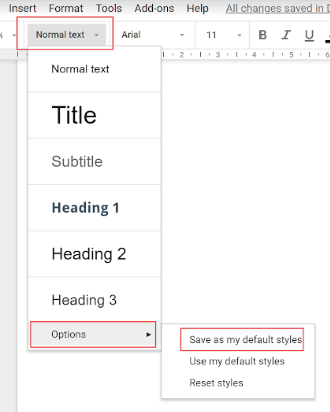
- Go to the toolbar and click on Format. Choose Paragraph Styles and a menu will drop down.
- Select Normal Text. Click on Update ‘Normal Text’ to Match.
- Go back to the Paragraph Styles tab and click Options found at the bottom of the menu.
- Click Save As My Default Styles. This will save your desired font settings as default.
Method 2 – Change Page Setup Settings

Changing your Page Setup to default will apply your desired setting everytime you create a new document.
- Open your Google docs and choose a blank file.
- On the toolbar, go to File. Click on Page Setup.
- Here you can choose the setting you want for your document. Choose between Portrait or Landscape. You can also set the size of your paper. If you have a specific paper margin in mind, click on the box and type your desired number.
- After you are done with the settings, click Set as Default.
- Click OK to apply the changes.
Method 3 – Change Default Heading
Changing the default setting of your titles and headings can also save you time.
- Go to your Google docs and choose an existing file. Choose a heading you want to highlight and select all of the text.
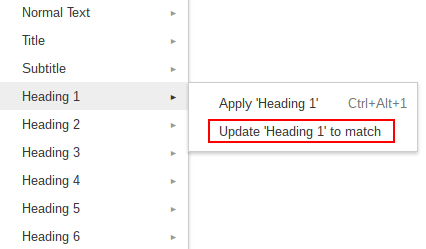
- On the toolbar, locate and click Format.
- On the drop-down menu, select Paragraph Styles. A drop down menu will open listing several options. You can choose what you want to edit, for example, Heading 1.
- Click Heading 1 then choose Update Heading 1 to Match.
- Go back to Paragraph Styles and at the bottom of its drop-down menu, choose Options.
- Click Save As My Default Styles.
- You can go back to Paragraph Styles and do the same to the other options until you have set your desired default settings to all the headings.
Conclusion
Saving time is important and therefore it is better to format your documents by the default settings you want. Write down in the comment section below if these methods are helpful to you in any ways.