
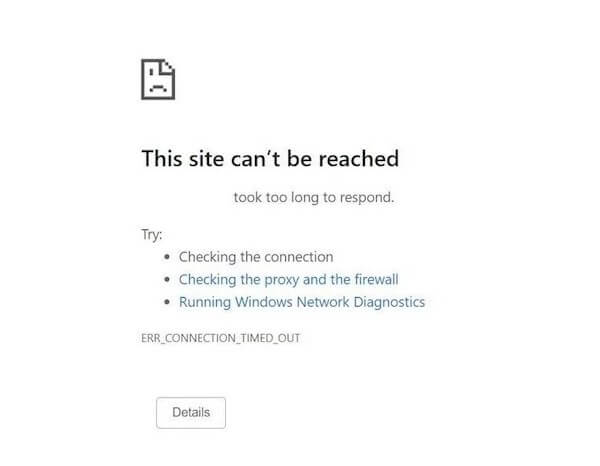
The ERR_CONNECTION_TIMED_OUT error is a common problem that occurs when trying to access a website or server for work or personal use. This can be caused by a number of factors, such as an incorrect DNS server address, a bad modem or router, or even a problem with your ISP.
Fortunately, there are some things you can do to fix this error code. In this blog post, we will walk you through some troubleshooting steps to fix the ‘ERR CONNECTION TIMED OUT’ network or server issue on your Windows 10/11 PC.
How to Troubleshoot Network Issue & Fix ERR_CONNECTION_TIMED_OUT Error on Windows 10 or 11 PC
This complete error message for this problem pops-up on your web browser “This site can’t be reached. domain.com took too long to respond. ERR_CONNECTION_TIMED_OUT.” Follow these troubleshooting steps and workarounds to help you fix the issue on Windows computers, whether you’re using Google Chrome, Firefox, Opera or Microsoft Edge browser.

Method 1: Change your DNS server
Domain Name Servers (DNS) are what convert a website name (like www.google.com) into an IP address that your computer can understand (like 216.58.217.46). Sometimes, your DNS server can get overloaded or bogged down, which will cause the ERR_CONNECTION_TIMED_OUT error to appear.
To fix this, we’re going to change your DNS server to a public one like Google Public DNS or Cloudflare DNS. Here’s how to do that:
- Open up the Network and Sharing Center by right-clicking on the network icon in the taskbar and selecting it from the pop-up menu.
- On the next screen, select “Change adapter options” from the left-hand sidebar.
- Find the network adapter that you’re using (usually, it will be labeled as “Ethernet” or “WiFi”), right-click on it, and select “Properties” from the pop-up menu.
- On the Properties window for your network adapter, find the “Internet Protocol Version 4 (TCP/IPv4)” entry and select it. Then, click on the “Properties” button.
Method 2: Check your Proxy Settings
Assuming that you are using Google Chrome as your web browser, follow the steps below to check your proxy settings:
- Open Google Chrome and click on the three dots in the top-right corner of the window.
- Click on “Settings” in the drop-down menu.
- Scroll down to the bottom of the page and click on “Advanced.”
- Under “Network,” click on “Change proxy settings…”
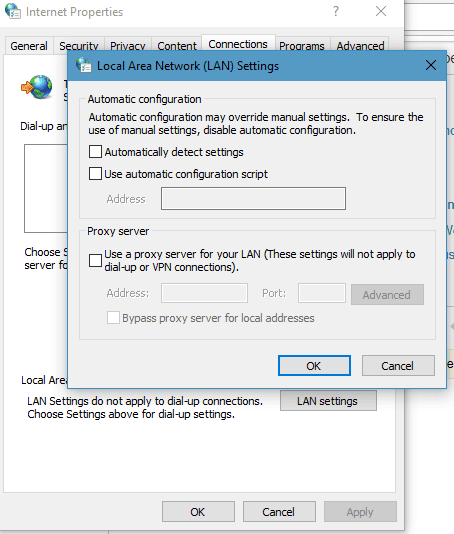
- This will open up the Internet Properties. Click on the “Connections” part and then click on “LAN settings…”
- In the LAN Settings, please uncheck the box next to “Use a proxy server for LAN…” and then click OK.
- Close out of the dialog box and try loading the page again.
Method 3: Temporarily disable your antivirus program
Here’s how:
- Right-click on the antivirus program icon in your system tray and select “Disable.”
- In the pop-up window, select a time period during which you want the antivirus program to remain disabled.
- Click “OK” to confirm and close the window.
- Try accessing the website again. If it loads successfully, re-enables your antivirus program and perform a full scan of your computer for malware.
Method 4: Reset your Windows Socket Protocol
If the above methods don’t work, you can try resetting your Windows Socket Protocol. To do this, follow these steps:
- Press the Windows logo key + R on your keyboard to open the Run dialog box.
- Type “cmd” into the Run dialog box and press Enter to open the Command Prompt.
- Type “netsh winsock reset” into the Command Prompt and press Enter.
- Restart your computer and check if the problem has been fixed.
If you are having trouble connecting to the internet on your Windows 10 or 11 PC, there are a few things you can try to fix. However, if all else fails, you can try resetting your Windows TCP/IP stack. By following these steps, you should be able to fix the issue and get back online in no time.