
There are instances when you need to add an image or some pictures to your Microsoft Excel spreadsheet for a better visual presentation. However, doing so will only allow you to insert the image above the sheet and not inside the MS Excel worksheet cell. It may not look as we intended, but it is better than having no picture at all.
Now, Microsoft is featuring a new tool for Microsoft Excel. You can now insert images and put a photo within an Excel cell thanks to the latest IMAGE function. No matter how you want to adjust the rows and columns, the image stays in place inside the cell. You can create, resize cells, sort, filter, or move them while the image display also dynamically adjusts to your changes.
How to Insert Images or Picture Data Inside Microsoft Excel Spreadsheet Cells using the New IMAGE Function
If you are making a presentation using Microsoft Excel, it helps if you add images such as graphs or illustrations to reference or display an information and better present your data. Using the IMAGE function, you can import pictures with various file extensions such as JPEG, PNG, ICO, TIFF, BMP, or GIF. You can also insert WebP format and import pictures from websites or specific URLs.
To use the IMAGE function and insert images into the cells, follow the procedure below.
- Launch the Microsoft Excel spreadsheet file where you want to insert an image.
- Click or tap on the cell.
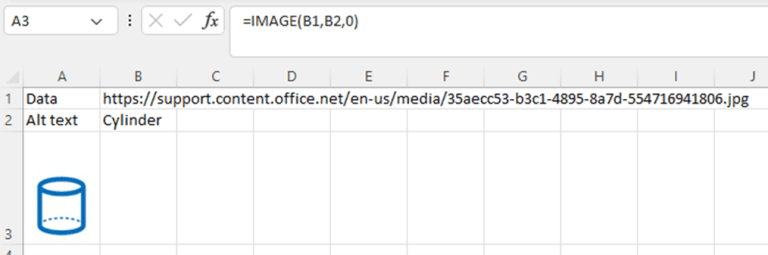
- Enter the following formula: =IMAGE(source, [alt_text], [sizing], [height], [width]). Insert the corresponding values based on their description below.
- Press the Enter key and wait for your image to appear.
How Does the IMAGE Function Formula Work?

Here are the specific descriptions from the IMAGE formula.
- Source – includes the URL of the image file. Begin with HTTPS and include supported file extensions.
- Alt Text – alternative text or description of your image. This is optional if you do not want to add a description.
- Sizing – indicates the dimensions of your image. The values include 0 for maintaining the aspect ratio and fitting into the cell, 1 for filling the cell and ignoring the aspect ratio, 2 for maintaining the original size of the image while possibly exceeding the boundaries, and 3 for customizing the size of the image through the Height and Width values.
- Height – indicates the height of the image.
- Width – indicates the width of the image.
Wrapping It Up!
The IMAGE function is available for Office Insiders in Beta Channel. You can access it on Android devices, Windows, Mac, iPhones, and iPad. Windows should run Version 2209 (Build 15608.10000) or later. Android devices must run 16.0.15608.10000 or later. Mac should be running Version 16.65 (Build 22080701) or later. iPhone or iPad runs Version 2.65 (Build 22080701) or later.
What do you think of the new IMAGE function to insert photos inside Microsoft Excel correctly without the need for a workaround? We value your opinion! You can tell us in the comment section below.