
Sometimes, it helps to run a diagnostic scan to see whether problems are lying around in your Windows computer. To help you check if there are RAM issues on your Windows 10/11 PC, you can run the Windows Memory Diagnostic Tool.
However, what happens next if you receive the BSOD error with status message,
“Hardware problems were detected. To identify and repair these problems, you will need to contact the computer manufacturer. Although the test may appear inactive at times, it is still running. Please wait until testing is complete.”
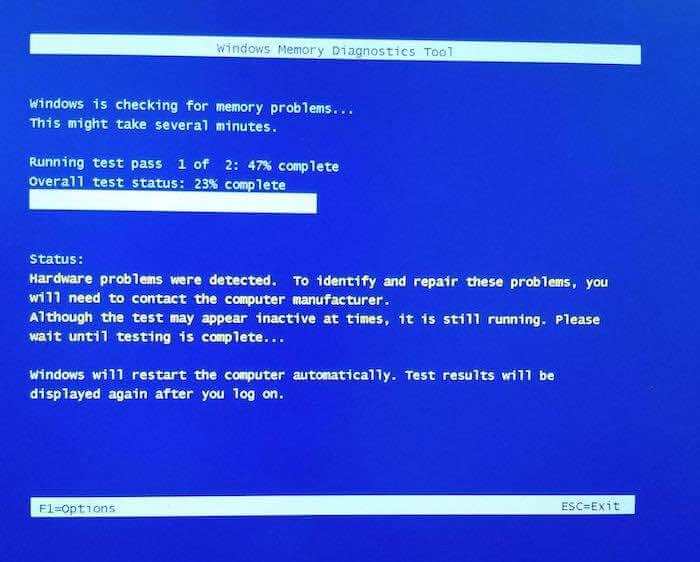
When you see this error message after running the Windows Memory Diagnostic Tool, it means that there are issues with your computer hardware. It can occur on a laptop or desktop computer even those from well-known manufacturers such as Dell and HP.
How to Troubleshoot & Resolve Hardware Problems Were Detected Issue when using Windows Memory Diagnostic Tool
There are various possible causes of the hardware problems detected an issue on your Windows 10/11 PC. Fortunately, you can always troubleshoot it with several fixes we have indicated below.
Solution #1 – Run Windows Troubleshooter
- Click the Start button.
- Go to Settings.
- Select Update & Security.
- Click Troubleshoot.
- Choose Hardware and Devices.
- Click the Run the troubleshooter button.
- After completing the scan process, click Apply this fix.
- Restart your computer.
Solution #2 – Clear the CMOS using the Battery Method
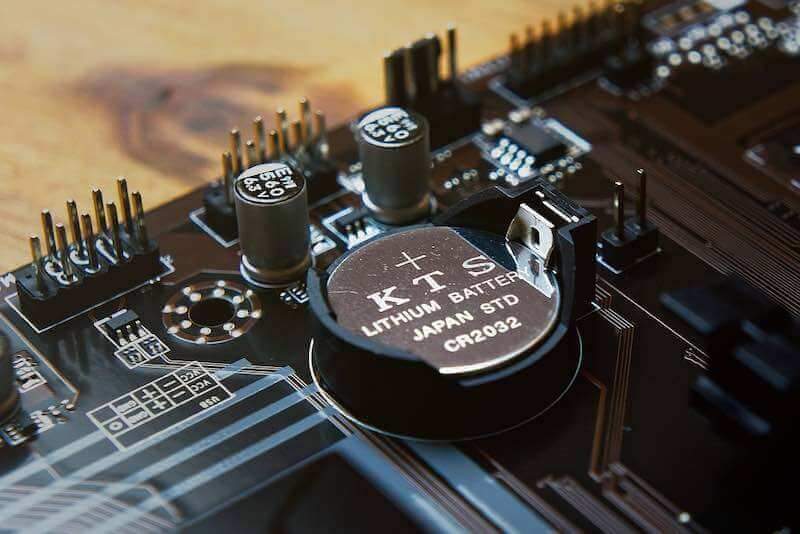
There are different ways to clear the CMOS on your Windows 10/11 PC. Clearing the CMOS will reset your BIOS to its factory setting. While it will delete certain configurations or customizations in your computer, clearing the CMOS will also help fix hardware issues.
- Power off your computer.
- Unplug your computer from the power outlet if applicable.
- You can press the Power button several times. It will help clear out any capacitors.
- Now, turn your computer over and open the case or the battery panel where you can find the CMOS.
- Look for your CMOS battery.
- Carefully remove the battery. If you find a clip, make sure not to bend it.
- After removing the battery, wait for a few minutes.
- Now, place the CMOS battery back to its location.
- Restart your computer.
Solution #3 – Undo Overclocking Settings on your BIOS
If you have tried to overclock some of the frequencies in your BIOS settings, it may be the reason why the Windows Memory Diagnostic tool detects hardware problems.
What you can do is navigate to your CMOS and BIOS settings. Look for frequencies that are on higher voltage settings than recommended by your system. You can set them back to their normal and safe default settings.
After resetting the frequencies in your BIOS, try performing the Windows Memory Diagnostic tool scan again.
Do you have other solutions that can help fix the hardware problems on Windows 10/11 PC? We would love to know more methods that will work so other users can benefit as well. You can share them with us in the comment section below.