
There are certain security features in our Windows PC that protect our devices from threats and other outside attacks. The Trusted Platform Module or TPM is one of these security tools that use integrated cryptographic keys. It is a dedicated microchip embedded in the motherboard, which stores your credentials securely, encrypts your files, and blocks malicious software attacks.
Seeing an error on our TPM could mean panic and can cause worry on our part, as it may affect the overall security of our Windows 10 or 11 PC. At times, when the computer’s Trusted Platform Module has malfunctioned it shows error messages and codes on the screen.
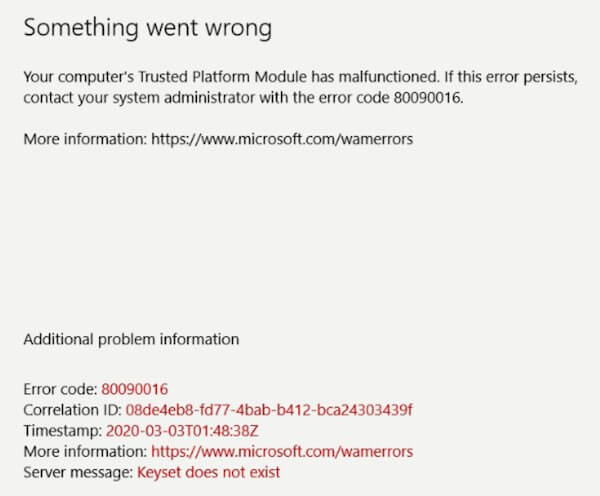
“Something went wrong. Your computer’s Trusted Platform Module has malfunctioned. If this error persists, contact your system administrator with the error code 80090016. More information: http://www.microsoft.com/wamerrors.”
There are different forms and codes of the TPM issues, such as 80090016, 800900030, 80090034, and C0090016.
How to Troubleshoot & Resolve Your Computer’s Trusted Platform Module has Malfunctioned Error Code on Windows PC
While a TPM malfunction happens, there are also ways for you to troubleshoot the problem on your Windows PC. Let us find out how you can fix the Trusted Platform Module computer malfunction error.
Solution #1 – Install Available Updates on your TPM
- Launch the Device Manager on your Windows PC. You can use the Search bar or press the Windows key + R to open the Run Dialog Box. Enter devmgmt.msc.
- Go to Security Devices and click the arrow to expand the menu.
- Right-click on Trusted Platform Module 2.0.
- Click Update Driver.
- Choose Select Automatically for Drivers.
- Now, install available software updates.
- Restart your device.
Solution #2 – Do a Clean Boot on your Windows PC
- Click the Start button on your Windows PC.
- On the Search bar, enter sysconfig to open the System Configuration window.
- Navigate to the Services tab.
- Go to the bottom and check the box next to Hide all Microsoft services.
- Select all the services listed above.
- Click the Disable All button.
- Click OK.
- Now, open the Task Manager. You can press CTRL + Shift + Esc to open the window.
- Head over to the Startup tab.
- Select each service followed by clicking the Disable button at the bottom. You can also right-click on each service and select Disable.
- Click OK.
- Restart your computer.
Solution #3 – Clear your TPM
- Before performing this method, you need to backup your data and files.
- Open the Settings menu of your Windows PC.
- Select Update & Security.
- Go to the left and click Windows Security.
- Choose Device Security.
- Navigate to the Security processor.
- Select Security Processor Details.
- Click Security Processor Troubleshooting.
- Click Clear TPM.
- Choose Clear and Restart.
Solution #4 – Uninstall your TPM Driver
- Navigate to the Device Manager of your computer.
- Go to Security Devices.
- Right-click Trusted Platform Module 2.0.
- Select Uninstall Device.
- Click Uninstall.
- Restart your Windows PC to reinstall TPM automatically.
Solution #5 – Delete the NGC Folder
- Open the File Explorer by pressing Windows Key + E.
- Enter the following file path: C:\Windows\ServiceProfiles\LocalService\AppData\Local\Microsoft.
- Right-click on the NGC Folder.
- Select Properties.
- Go to the Security tab.
- Click Advanced.
- Go to the Owner section.
- Click Change.
- Enter your local account username.
- Click Check Names.
- Click OK.
- Look for Replace Owner on Subcontainers and Objects and check the box next to it.
- Click OK.
- Look for the NGC folder and double-click it.
- Now, erase all the contents.
- Restart your computer.
Solution #6 – Remove your Windows Credentials
- Launch the Run Dialog Box by pressing Windows Key + R.
- Enter Control.
- Go to User Accounts.
- Select Credential Manager.
- Click Windows Credentials.
- Navigate to the Generic Credentials section.
- Select each problematic credential and click the Remove option.
- Do the same to all problematic application credentials.
- Restart your Windows PC.
Solution #7 – Turn Off Hyper-V
- Open the Control Panel of your computer.
- Go to the View by section and set it to Category.
- Choose Programs.
- Click Turn Windows Features On or Off.
- Look for the Hyper-V box and uncheck it.
- Click OK.
Do you have other methods to fix the TPM malfunction computer error on PC? You can tell us in the comment section below.