
One of the Creators Update for Windows 10’s most impressive features is the Night Light feature. This feature helps you sleep better by reducing the blue light your computer emits. Blue light is the type of light that keeps you awake, so using this feature can help you fall asleep faster and get quality rest. It also helps reduce eye strain and headaches.
Windows 11 also supports the Night Light feature, but most users realize it’s not working after updating their Windows. This article will help you diagnose and quickly fix the problem.
Root Causes of the Night Light Issue

Most users realize it’s not working or not turning on or off after updating their Windows 11. A bug within the Windows update or the display driver may be responsible for the malfunction.
In addition, the night light settings might not be available if your device uses a DisplayLink or Basic Display driver. Sometimes, the wrong date and time affect the functionality of night light. If your computer displays the wrong date and time, your CMOS battery likely needs to be replaced.
Tips to Troubleshoot Night Light Tool Not Working, Won’t Turn On or Off on Windows 11 PC
Find these troubleshooting techniques and workarounds to help you fix the problem if your Night Light feature is greyed out, not working or you can’t enable or disable it from the settings menu.
1. Adjust the strength level of Night Light
The most common mistake Windows 11 PC users need to pay attention to is the low intensity of the night light setting. To fix this:
- Press Win + I on your keyboard > click System.
- Select Display > Night light.
- Increase the night light strength to help you see its difference from the normal mode.
2. Set your preferred schedule and enable location services
The Night Light option may default to turning on/off automatically based on your computer’s time zone. Fix this problem by following this process:
- Press the Windows icon on your keyboard > Click Settings.
- Click System > Display > Night light settings > Turn Schedule night light on.
- Below the toggle, click Location settings to enable location services.
- You can see a box under “Location for this device is off” > click Change.
- Click the return button > now you can choose between the “Sunset to sunrise” or “Set hours” option.
- By selecting the “Set hours” option, you need to choose the specific time when the night light automatically turns on/off every day.
- Click the check mark to save the changes.
3. Adjust the date and time
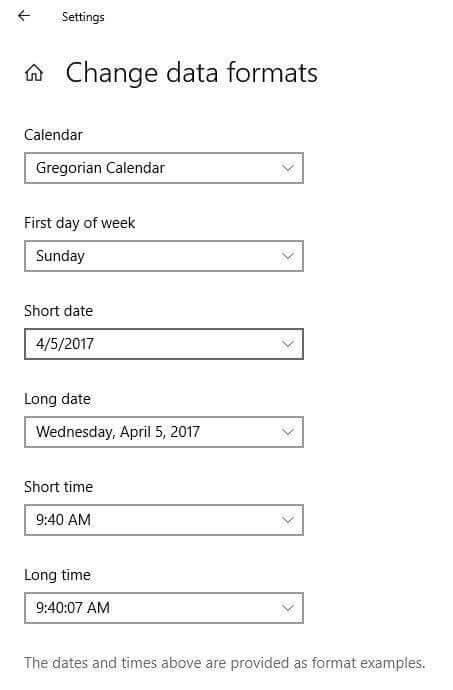
You may turn the Night light feature on/off automatically by setting it according to your preferred schedule. However, if your PC’s date or time is incorrect, the night light feature might not work as intended. Follow the steps below to adjust your computer’s date and time:
- Move your mouse pointer over the time and date on your taskbar.
- Right-click your mouse and click “Adjust date/time.”
- A new window will appear.
- Turn off the toggle under the “Set time automatically” and “Set time zone automatically” settings.
- Choose the appropriate time zone.
- Another pop-out window will let you adjust the date and time manually.
4. Update your Windows 11 OS
Updating your Windows 11 operating system to the latest available version can give you access to new features and bug fixes that will help you work more efficiently. It also includes many upgrades and improvements that make your computer run faster and smoother. Here’s a quick and easy tutorial:
- On the bottom left corner of your taskbar, click “Start.”
- Select “Settings.”
- To check if your Windows is up to date, click “Windows Update.”
- Click “Check for updates.”
- If you see the status: “You’re up to date,” you successfully installed all the updates.
- Restart your laptop or computer to see if it solves the issue.
5. Update your computer’s display driver
One cause of a malfunctioning display is an old or faulty display driver. Updating your display driver might help you fix the problem with Night Light tool on Windows 11 being greyed out or disabled.
- Click the “Start” button.
- Select “Device Manager.”
- Click “Display adapters” and right-click it.
- Select “Update driver.”
- A pop-out window will appear asking: “How do you want to search for drivers?”
- Click “Browse my computer for drivers.”
- Select the “Let me pick from a list of available drivers on my computer” option.
- Select the model, then click “Next.”
- It will start installing updated drivers.
- A note saying, “Windows has successfully updated your drivers,” will appear on another pop-out window.
- Click “Close.”
In Closing
So there you have it. Remember that even a small amount of neglect can develop into serious eye problems. Fortunately, the tips and tricks in this article above can help you get your tired eyes back to working order.