
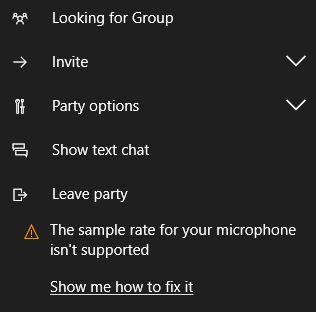
Users recently complained about the error “Sample Rate for Your Microphone isn’t Supported” if they open the Xbox application. The peripheral error only affects the Xbox app in Windows 10 or 11 computer because the microphone or headset works well with any other app.
We investigate this particular issue by reviewing various user reports and analyzing various patches that are generally recommended by those who have successfully resolved the bug. It seems that there are several different scenarios that could trigger this problem.
What is the cause of the error “Sample Rate for Your Microphone isn’t Supported” on Xbox App?
Here is a list of the most common perpetrators that triggers this issue on Xbox app on PC:
Reason #1 – General inconsistency of the recording device
This error may occur due to a general inconsistency of the audio recording caused by two conflicting applications or a user error. In this case, you should use Audio Recording Troubleshooting (an integrated utility designed to identify and recommend an appropriate repair strategy).
Reason #2 – Bad Windows update
We couldn’t find the exact update that caused the error message, but for two months there was a flood of user reports complaining about the glitch. Since then, Microsoft has released a patch for the problem, which is confirmed to fix the bug. In this sense, you can solve it by installing each pending update and upgrading your Windows version to a version older than 1803.
Reason #3 – Drivers are not compatible with the Windows version
It turns out that many headsets have not yet been optimized for the latest version of Windows. So if you use them with special drivers, you could get this error message because of incompatibility problems. If this scenario applies, you can solve the issue by uninstalling the current driver and returning to the general driver.
Reason #4 – The Xbox Live Core service is down
Although it is an unlikely offender, it has been confirmed that there is a direct correlation between this error message and the status of Xbox Live services. If the basic services have failed, the parties’ requirements are not met and this error is displayed. In this case, the only solution is to wait for the services to come back online.
Reason #5 – NAT type is set to Close
Another potential author is a NAT type that is set to Close. The Xbox Companion software can trigger this error because it cannot communicate with Xbox servers. In this case, you can solve the problem by repairing the NAT using the Fix it tool on the Xbox Networking tab.
Reason #6 – Corrupted Xbox App
Another reason that could cause this error is an Xbox glitched app. Damage inside the Temp folder can mislead the server into believing that the connection is not correct. If this scenario applies, you should be able to solve the software bug by completely resetting the Xbox application and removing all temporary files.
How to Troubleshoot Issue and Fix ‘Sample Rate for Your Microphone isn’t Supported’ Xbox Error on Windows 10 or 11 PC?
Solution 1: Uninstalling and Reinstalling the Device Driver
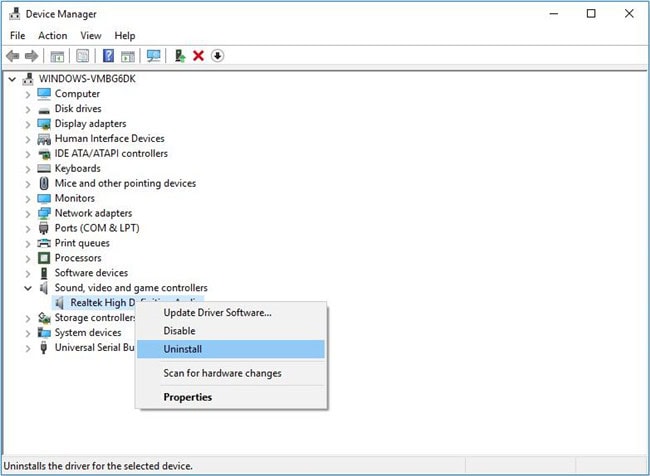
- Access the properties of your microphone in the Sound Control Panel.
- Go to General tab
- Controller Information Section
- Properties
- Change Settings
- Driver tab
- Uninstall the device and make sure that “Delete drivers” is enabled.
- Restart and Windows installs the generic microphone drivers. Then everything should work.
Solution 2: Check App’s Permissions
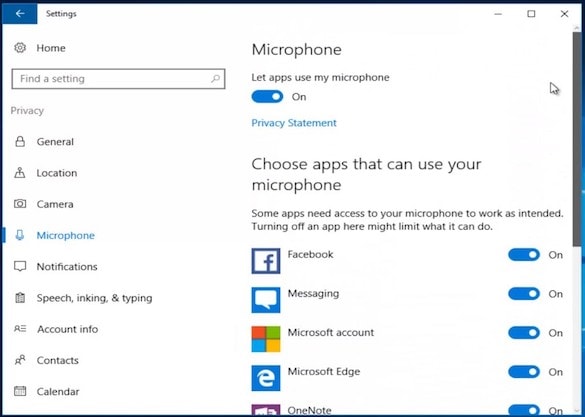
To use the microphone with any program on the Windows 10 platform, you must give permission. This should be the default value, but it is not a rule. Even if it is a pre-installed application.
First of all, we must confirm that your system has global authorization to access the microphone (recording device). Then, we can individually allow the Xbox app to use the microphone in the Application Settings menu.
Follow these steps to ensure that the Xbox application has access to a microphone:
- Press the Windows + I button to open the application settings.
- Select Privacy.
- In the left pane, select Microphone.
- Under “Select which apps can access your microphone,” turn on the Xbox app.
Solution 3: Make Sure your Sound is not Muted
Some games work in full screen mode, so you can’t see the taskbar. This will ensure that your sound is not silent or mute:
- Press the Windows key on your Windows 10 device or keyboard or select the Windows icon in the lower left corner of the main screen.
- Press the Volume icon on the taskbar and make sure that the volume is greater than 0 and that the sound is not muted.
Solution 4: Install the Drivers Using the Device Manager
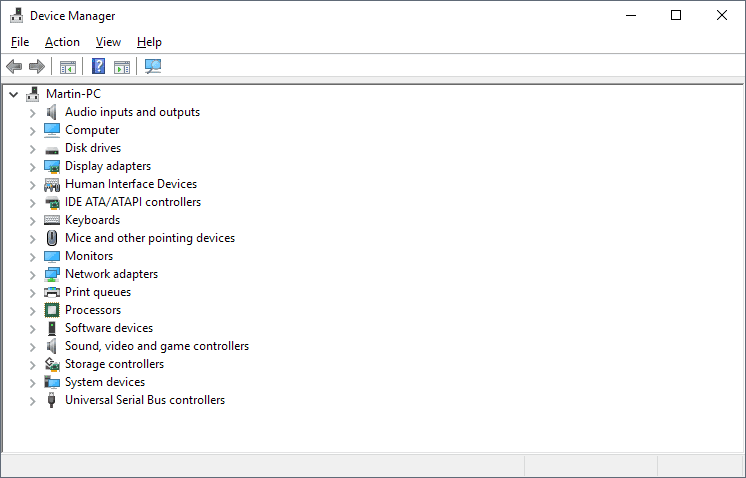
- Press Windows + X.
- Click Device Manager.
- Once the Device Manager is open, select the device, right-click it, and then click Update Driver.
- This starts the Driver Wizard, which has two options:
- Search automatically for updated driver software – it’s possible that Windows might have the driver software if you haven’t checked it yet, if it takes too long, then the following option is usually the best.
- Browse my computer for driver software – if there is a compatible driver and you already have the driver files, just point it at it and Windows will automatically install it for you.
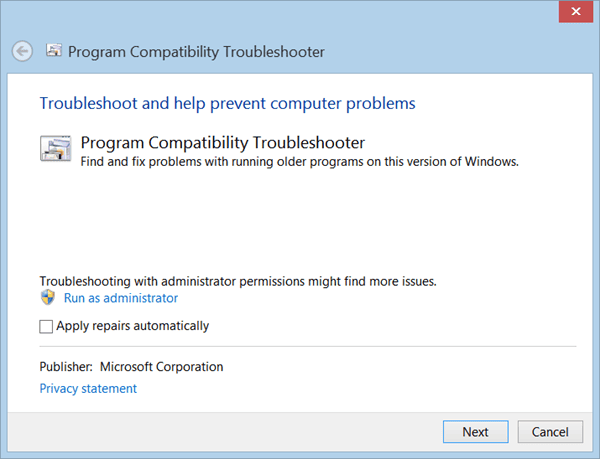
Solution 5: Use the Program Troubleshooting Compatibility
- The first thing to do is to show where the installation files are located. If you are installing from a USB stick or CD/DVD. Start the File Explorer (Windows key + E) and open the location of the installation files.
- Right-click on the program installation file, it can be called setup.exe or similar. Click on Compatibility in case of glitches.
- The Program Compatibility Troubleshooting Wizard starts, which searches for problems.
- Select the “Troubleshooting” option.
- Select a version of Windows known to work with the program. I notice that the program works well under Windows Vista (with Service Pack 2), so I will select this option. Click on Next.
- Continue the program installation procedure by clicking on Test Program.
- Follow the on-screen instructions to install the program as usual.
- If all goes well, click on the option at the end of the “Yes, save these settings for this program” wizard.
- Wait until your settings for the program are saved.
Conclusion
If your microphone still does not work, a hardware error may occur. If you have an external microphone, try connecting it to another PC and see if it works. Otherwise, the microphone equipment may be damaged.
If the microphone works on another computer or device, but not on the current one you’re using, there may be a problem with the audio jack on your PC. Try connecting it to a separate microphone input jack, provided you are using one with front and rear audio connectors.