
The newly released Nintendo Switch firmware 10.0.0 update enables gamers to remap their controller button, which includes turning off their screenshot buttons. Often, we unknowingly hit the capture button, which is located on the left of our controllers, thus loading up a lot of screenshots accidentally.
While it may not disrupt your game, it will fill up your system memory fast. Deleting these screenshots takes time so, why not just completely disable the screenshot function in your controller?

The added feature is available for Switch Pro Controller, Joy-Con, and other third-party controllers.
Nintendo Switch Limited Storage
With the 32GB limit of your Nintendo Switch, it is no wonder you may also experience limited storage. Nintendo Switch only allows you up to 1,000 screenshots. When you reached the limit, a message will pop up to notify you.
So, even when you accidentally hit the Capture Button many times, turning it off will not save any screenshot. Check out this Nintendo Switch trick on how you can turn off the screenshot function.
Disabling the Screen Capture Function on Nintendo Switch
- Connect your controller to Nintendo Switch.
- On the home screen, tap the gear icon to open System Settings.
- Click Controllers and Sensors.
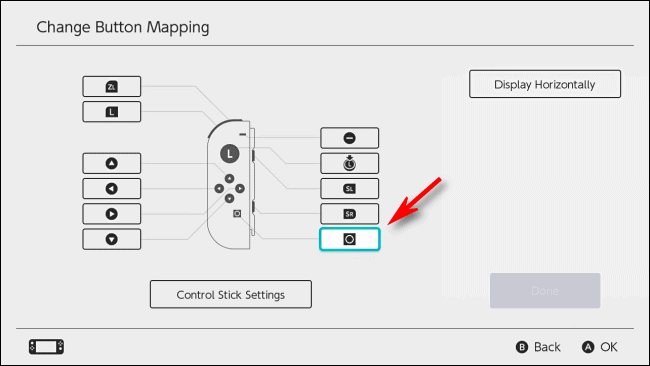
- On the left, select Change Button Mapping.
- You will then see the list of controllers attached to your Switch.
- Click the name of your controller.
- On the left, tap Change.
- There will appear a visual diagram of your controller.
- Scroll around the buttons until you highlighted Capture Button.
- Press the A button on your controller to click OK.
- A new window will appear giving you options on what to do.
- Select Disable and press the A button again to click OK.
- The diagram screen will appear again. Click Done.
- A confirmation message will appear, indicating that the button mapping has been changed. Click OK.
- Exit the System Settings.
Was the article helpful? We would love to know what you think so drop us a comment below.