
Running a Diagnostic Scan on your Chromebook can help enhance its overall performance. The diagnostics tool will scan for hardware and system errors, troubleshoot and check if there are necessary repairs needed for your computer. Overall, it will help maintain the health of your Chromebook.
This tool works on every Chromebooks released with the latest Chrome OS installed including devices from Acer, Lenovo, HP, Samsung, and Google.
How to Use the Chrome OS Diagnostic Scan on your Chromebook
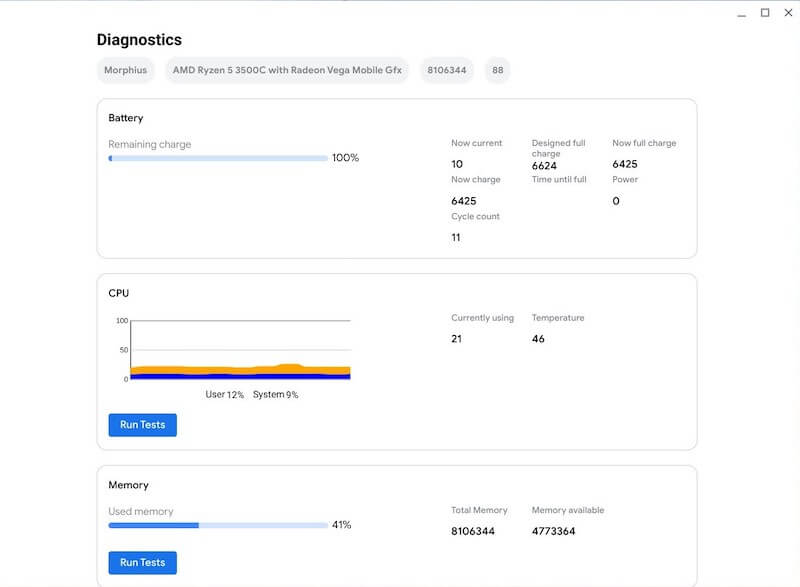
When you run the diagnostics app on Chrome OS, you will see the health of your Chromebook in different sections. The first is the Battery of your Chromebook. You can test and check the current health of your battery. The cycle count shows how many times you have performed a full charge on your Chromebook. It will also indicate the rate of your battery being charged or discharged.
The second section in your Chromebook’s diagnostics app is the CPU. In here, you can see the percentage Chrome OS is currently using. It will also show the current temperature and speed of your CPU. The third section is Memory. You will see the bar that indicates how much memory you are using.
Seeing these sections of your Chromebook computer will let you know how your device is performing. That way, it will help you realize what steps you can do to maintain its overall health.
How to Run Diagnostic Scan Tool and Perform a Troubleshooting Test on Chromebooks

You can launch the Diagnostic Scan in two ways. Check out the methods below for how to do it.
#1 – Open Chromebook Diagnostic Scan Via Search Box
- On your taskbar, click the Search icon.
- Enter Diagnostic.
- Click the Diagnostic app.
- To check your Battery health, go to the Battery section.
- Click Run Charge Test or Run Discharge Test.
- To scan your CPU, navigate to the CPU section.
- Click Run CPU test.
- If you want to know more about the current Memory of your Chromebook, click Run again to perform another scan.
- To get information on all your Diagnostic scans, click Save session log.
#2 – Launch Diagnostic Scan Via Chrome OS Setting
- On the taskbar, click the Clock icon.
- The Quick Settings panel will appear.
- Click the Gear icon.
- Select About Chrome OS.
- Click Diagnostics to open the Diagnostic app.
- Follow the steps from Method #1 to run the different scans.
What did you find in running the diagnostic scan in your Chromebook? You can share your thoughts with us below.