
When watching movies or TV show episodes on your VLC Media Player, it winds you up when you see the character’s lips not in sync with the audio. You may hear what they are saying, but their lips are moving differently. The subtitles or closed captions are out of sync too. While it can still allow you to keep up with the video or movie, seeing that characters no longer speak while the audio tells you otherwise can be a spoiler.
There are audio sync delays that you may experience on VLC Media Player due to various reasons. However, it does not mean that you have to put up with it. There are also ways to troubleshoot the audio and video playback error and bring back the perfect sync on your movies.
How to Fix Audio/Video Delay or Sound Out of Sync when Playing Movies on VLC Media Player App on PC or Mac
So, how do you troubleshoot and fix the audio delay syncing issue on your VLC Media Player? You can easily resolve the VLC Media Player app sound error either on your Windows 10/11 PC or Mac computer.
Let’s check out the solutions below. But keep in mind that you can’t permanently get rid of sound issues like this on any streaming service platform or media player. Given that, let’s dive in.
#1 – Relaunch your VLC Media Player
The first thing you can do to resolve the audio lag or delay error on VLC is to exit and close the VLC Media Player app completely. Wait for at least 1 minute. Then, try to relaunch it and play the movie you are watching.
#2 – Press Several Keyboard Shortcuts or Hotkeys
There are keyboard shortcuts or hotkeys that will adjust the increment level of your audio. It will help you sync the audio to your video manually. While it works, you may need to have a bit of patience in adjusting the increment level of your sound and the visual picture.
- Play the video on your VLC Media Player desktop app on PC or Mac.
- For Windows 10 PC, you need to press the keys K and J. To increase the increment or speed of your audio, press J. To slow down your audio, press K.
- For Mac, you need to press the keys G and F. Press the key G to slow down and the key F to increase speed.
#3 – Adjust your Audio Synchronization Compensation Settings

- Launch the VLC Media Player app on your Windows 10/11 PC or iMac/MacBook computer.
- Go to Preferences.
- Navigate to the Audio tab.
- At the bottom left, go to Show Settings.
- Select All.
- On the right panel, look for the Audio desynchronization compensation option.
Now, adjust the audio value. If it is ahead of the video, set the value to negative. Otherwise, add a positive value to increase audio speed. Note that the number is in milliseconds, which means that a 2 second ahead is a negative 2,000 value.
#4 – Modify VLC Audio Track Synchronization Settings
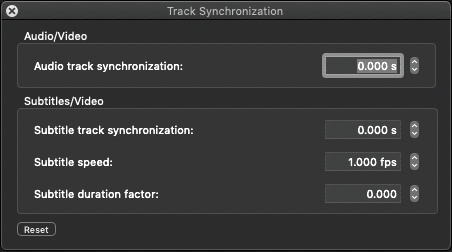
Another way to adjust audio synchronization is to edit the Audio Track Synchronization settings on your VLC app.
- For Windows 10, navigate to the Tools tab on the toolbar of your VLC Media Player app.
- Select Effects and Filters.
- Go to the Synchronization tab.
- Look for Audio/Video.
- Now, adjust the Audio Track Synchronization based on each second.
- On a Mac computer, you can access the Audio Track Synchronization settings from the Window tab.
Which of the solutions above helped you fix the audio delay problem on your VLC Media Player app? You can tell us more in the comments below.