
QuickBooks is a crucial tool for managing business money, but blunders can be quite annoying. The service on local computer started and then stopped issue is one such mistake that can disrupt your workflow and cause a headache.
But don’t be concerned! In this post, we’ll walk you through the procedures to troubleshoot and correct the problem and get your QuickBooks back up and running. We’ve got you covered, from enabling hosting to setting services. So, let’s get started and get your company back on track!
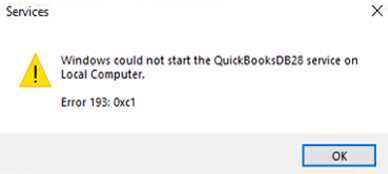
When encountering this QuickBooks app problem, your PC might show this error message “Windows could not start the QuickBooksDBXX service on Local Computer. Error 193: 0xc1.”
What Causes this QuickBooks Local Computer Issue?
The QuickBooksDBXX service on Local Computer started and then stopped error on QuickBooks app for Windows PC can be caused by various reasons, such as:
- A damaged QuickBooks Database Server Manager
- An unconventional installation path
- Inactivity of hosting when QuickBooks is installed on the host computer
Dealing with QuickBooksDBXX Service Glitch on PC

Turn on Hosting on QuickBooks
If hosting is inactive when QuickBooks is installed on the host computer, you can turn on hosting by following these steps:
- Click on the File menu and select Utilities, then Host multi-user access.
- On the Host multi-user access window, click Yes.
Change the Software Install Location on your PC
If you’ve installed QuickBooks in a non-standard path, it can also cause the QuickBooksDBXX service error. If that’s the case, you can reinstall QuickBooks using the default installation path:
- C:\Program Files\Intuit\QuickBooks(year) (32-bit)
- C:\Program Files (x86)\Intuit\QuickBooks (year) (64-bit)
Configure Services for QuickBooks on Windows Computer
If the QuickBooksDBXX service error persists, you can configure the services by following these steps:
- Press the Windows key+R to open the Run window.
- Type services.msc and press Enter. You can also look up services.msc on the Windows search bar.
- Look for the QuickBooksDBXX service that matches your version in the services window: • QuickBooks 2020: QuickBooksDB30 • QuickBooks 2019: QuickBooksDB29 • QuickBooks 2018: QuickBooksDB28
- Double-click the service.
- Set the Startup Type to Automatic and Service Status to Running or Started.
- Head to the Recovery tab.
- From the First failure drop-down, choose Restart the Service. This automatically restarts the QuickBooksDB service if it fails. Do the same for Second failure and Subsequent failures.
- Click OK to save the changes.
- Reboot your computer.
Wrapping Up!
Don’t let the service error dampen your spirits when using the QuickBooks app. With the easy-to-follow steps we’ve outlined above, you’ll be able to fix the issue in no time and get back to managing your business finances smoothly. So go ahead and tackle this glitch with confidence, and keep your business running smoothly!