
Sometimes there are instances when you need to export and save a copy of your shared files and chat history on Skype. It might be that you want to export these data and download them for offline safekeeping especially for those important files and conversations.
Exporting and downloading shared files as well as your chat history can be done on Skype for Windows 10. It’s not as easy and straightforward as the old version of Skype but it is still possible.
Read on to learn more about how to request a copy of your shared files and conversation history as well as some methods on opening the resulting backup files.
How to Export your Files and Chat History from Skype
To start downloading your shared files and conversation history from Skype, do the following:
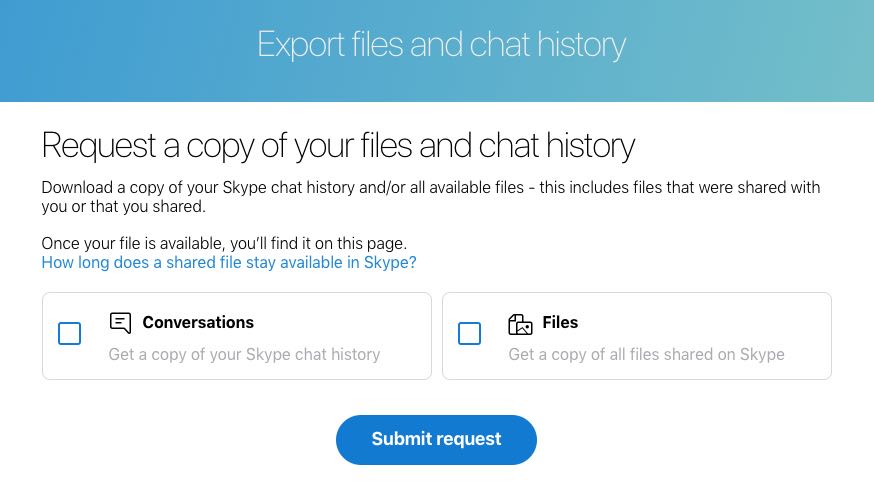
- Login to Skype on the web and go to this page https://go.skype.com/export.
- Choose the option to download your Conversations, Files or both.
- Select Submit request.
- Once your request is complete, you’ll get a notification in Skype along with a link to view or download your file.
- If you don’t get a notification in Skype, check the export page to download your files.
- Click the Download button to download a “.tar” file that contains a copy of your requested files.
Please take note that this process may take some time. You just have to wait a bit and then check once in a while if the export is completed.
How to Open the Files and Chat History you Download from Skype
The downloaded file that contains your Skype files and conversation history is compressed in a TAR format. Opening .tar files on a Mac is easy as macOS has built-in support for this file format. However, Windows 10 users might need to install a third-party app to open the file or extract it through the Command Prompt. Here’s how to do it.
Extracting the .tar File on Windows 10:
- Open the Run window by pressing the Windows + r keys on your keyboard.
- Type in cmd and then click OK.
- Navigate to your file using the “change directory” (CD) command. You can type CD DIRECTORY, replacing DIRECTORY with the folder name where you downloaded file and then press Enter. (example: CD Desktop or CD Downloads)
- Type tar -xvfYOURFILENAME_export.tar, replacing YOURFILENAME with the name of your exported file which usually follows the pattern 8_skypename_export.tar or 8_live_skypename_export.tar and then press Enter.
- When the command is executed, you will see your extracted messages file named messages.json file in the directory.
- In order to view your conversations, you can download the file viewer provided by Skype at https://go.skype.com/skype-parser.
- After downloading the viewer, open it by selecting the index.html file from the skype-parser folder.
- Browse to the messages.json file and then click the Load button.
Extracting the .tar File on macOS:
As we mentioned above, macOS supports the .tar file format natively. So, in order to open it, you just need to browse to the .tar file and double click on it to extract the file.
That’s it. You now have a local copy of your Skype files and chat history. Anytime you need to download a fresh copy of these files, just follow the steps above.