
You can’t deny the many advantages brought about by the Solid State Drive (SSD) storage technology to modern computers. It offers lightning-fast read-write speed, quiet to no noise at all, and has a very low power consumption requirement as compared to the traditional Hard Disk Drive (HDD).
However, as new users switch to SSD and upgrade their Windows 10 PC’s performance, some of them experience the issue concerning the SSD device not being recognized or detected. Oftentimes, the new SSD won’t show up on File Explorer or Disk Management windows as well as “This PC” system settings.
If you are experiencing a similar problem, you are in luck as we will be discussing about how to fix it in this article. So, if your SSD is not detected, not recognized, or not showing up in your PC settings, read on to learn how to troubleshoot the issue.
How to Fix SSD Not Recognized, Detected or Not Showing Up Issue on Windows 10 PC

#1 – Assign a Drive Letter for your New SSD on Windows 10 Settings
One of the most common causes of the SSD detection issue on Windows 10 is the missing drive letter associated with the new storage device. Apparently, the new device might be conflicting with an existing storage drive that brings the error. To fix it, you need to manually set and assign a drive letter to your SSD using Windows 10 Disk Management.
- Launch your File Explorer and right-click on “This PC”.
- Click on “Manage”.
- Then, choose “Disk Management” under the Storage section.
- Now, right-click on the SSD partition and select “Change Drive Letter and Paths”.
- Select “Change” from the options.
- Assign a new drive letter from the dropdown menu.
- Click “OK” to confirm your new settings.
- Now, restart your PC and check if the SSD is now detected.
#2 – Initialize your New SSD
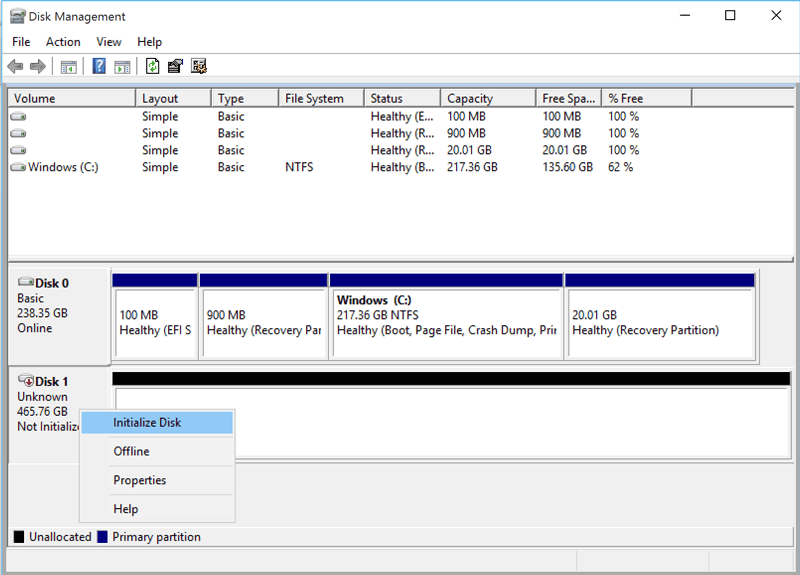
You need to initialize your new SSD drive to use it on Windows 10.
- Search for the Disk Management tool from the Start menu search bar.
- Then, right-click on it, and select Run as administrator.
- Now, right-click on your new SSD and select Initialize Disk.
- Select the SSD drive you want to initialize on the Initialize Disk dialogue box and select the partition style.
- Click OK to start the process.
- Now, go back to the Disk Management, right-click your SSD Volume and select New Simple Volume.
- Follow the on-screen instructions to assign the SSD volume and drive letter.
#3 – Update or Reinstall your Drivers
Reinstalling SSD Driver
The detection issue on your SSD might be caused by faulty drivers. To initiate a fresh installation of the device driver, you need to uninstall and reinstall your SSD.
- Launch your File Explorer and right-click on “This PC”.
- Now, click on “Manage” and select “Device Manager” under the System Tools section.
- Find the list of storage devices connected to your PC under the Disk Drives.
- Then, right-click on the SSD in question and click “Uninstall device”.
- Remove the SSD from your PC and try to restart your Windows system.
- Reconnect the SSD and see if Windows detects it. If it does, a new device driver will be downloaded and installed.
Updating Storage Controller Drivers
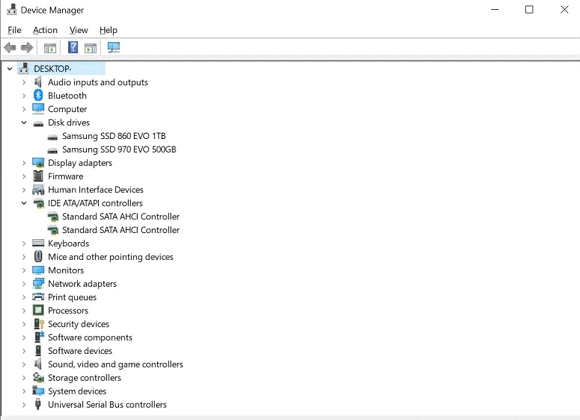
- From the Start menu, open the Device Manager window.
- Find the Storage controllers and expand the group.
- Now, right-click on the storage controller and select Update driver.
- Then, choose Search automatically for updated driver software.
- Windows automatically installs any available updates.
- Restart your computer and check if your new SSD is now detected or recognized.
#4 – Configure SSD Settings in your BIOS
If the SSD is missing in your BIOS, you will need to change the settings for your SATA controller. It is the hardware interface that connects your PC’s motherboard to the hard drive.
Specific instructions for accessing BIOS as well as the BIOS menu depend on the brand of your Windows computer. For most manufacturers, pressing F2 on startup will bring you to the BIOS screen. Once there, you will need to change the Onboard SATA Mode option to [AHCI] so Windows can recognize or detect your SSD drive.
That’s it! Let us know if any of the methods above worked for you.