
PC users sign up and install a VPN service on their Windows 10 computers to maximize privacy and security features when connecting to the Internet. A lot of various other reasons prompt anyone to use such a tool. However, not everything is smooth sailing when it comes to VPNs. Regardless of what operating system you are using, you are vulnerable to network errors.
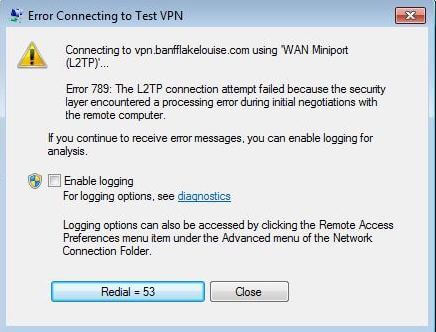
Today we will be talking about VPN error 789 on Windows 10. This error is one of the most common issues Windows users encounter on a regular basis. When you connect to the server using an L2TP protocol, the connection processing fails with error 789 followed by error 791. The client you are using might not be configured to connect to an L2TP server. The error message says:
“The L2TP connection attempt failed because the security layer encountered a processing error during initial negotiations with the remote computer.”
Some of the possible causes of this error include a wrong certificate or pre-shared key, the VPN client is behind NAT, machine certificate is not present or does not have “Server Authentication” as EKU, possible third-party firewall issues, network driver errors as well as problems like missing Encapsulation Registry key and disabled IPsec Keying Modules & Policy Agent.
How to Fix Error 789 when Trying to Establish L2TP Connection in Windows 10
Here are some troubleshooting tips you can try to help fix the error 789 on Windows 10.
#1 – Verify Certificate and Pre-Shared Key is Correct
The first thing you need to do is to check and verify if the certificate or pre-shared key is correct. Both the client and VPN server needs to have the certificate and pre-shared key configured similarly.
#2 – Re-enable the IPsec Service
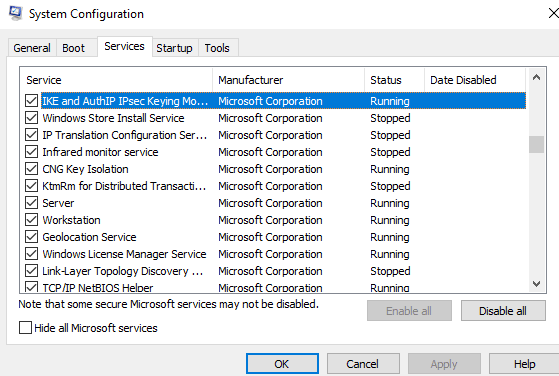
- Open the “Run” dialog, type “services.msc” and then hit the enter key.
- Now, find the “IKE and AuthIP IPSec Keying Modules” and “IPSec Policy Agent” services.
- Restart the service if the status is stated as “Started”. If not, you need to enable it to start the service.
- Then, select the “Startup Type” right after you double-click on each of the services and change the value to “Automatic”.
- Now, hit “OK” to save the changes.
After that, you can now restart the VPN service and try to initiate a connection again. See if the error appears.
#3 – Reset your Network Adapter
Another method is to reset the network adapter on your Windows 10 PC. To do this:
- Open the Device Manager from the Start menu.
- Find your network adapter.
- Now, right-click on it and then click Uninstall.
- Hit the OK button and restart your PC.
Windows 10 will automatically reinstall the network adapter driver upon reboot and reset it to default settings.
#4 – Create UDP Encapsulation Registry Key using Registry Editor

This troubleshooting method needs messing up with your Registry Editor. Take extra caution when working with this tool as it can irretrievably break your system.
This will help fix the issue if you are dealing with an L2TP VPN client or server that is behind a Network Address Translation or NAT.
- Open the Registry Editor on your PC by typing “regedit” on the Run dialog box.
- Click Yes to grant administrative privileges when the UAC prompt appears.
- Now, navigate to the following location on your Registry Editor:
- HKEY_LOCAL_MACHINE\SYSTEM\CurrentControlSet\Services\PolicyAgent
- Once there, you need to create a new value under this section.
- Right-click anywhere on the page then select New.
- Choose Dword (32-bit) Value from the options presented.
- Now, create a name for the new Dword Value:
- AssumeUDPEncapsulationContextOnSendRule
- Hit the Enter key to save your changes.
- Double-click on it and then, set the Base to Hexadecimal and the Value data to 2.
- Save the changes and restart your PC.
#5 – Try Other Service Providers

Some industry-leading VPN service providers have minimal to zero issues with Windows 10 compatibility. This means, that errors like this can be avoided if not eliminated. You can check out today’s popular companies and sign up for a free trial to see which one works best for your needs.
That’s it. You can also try to disable a 3rd-party firewall if you have one configured on your computer. If nothing works to fix the error 789, you might need to contact your service provider to help you troubleshoot the problem.