
Whether you’re a professional photographer or a hobbyist, the last thing you want is for your Sony camera to suddenly malfunction just when you’re in the middle of shooting a lovely scene.
Most of the time, these glitches are due to an outdated firmware. If this is the case, it’s important to learn how to update your Sony Camera firmware to the latest version.

Step by Step Method to Update Sony Camera Latest Firmware Version
But before you proceed, make sure that the battery of your camera is fully charged, or else, your camera will become inoperable if the battery dies suddenly in the middle of the firmware updates.
Follow these steps for the firmware update:
Check your Sony Camera’s Current Firmware Version
Just turn it on, pressure on the menu button, and go to the toolbox icon for Setup Menu. Look for and select the VERSION option to display the current firmware version of the camera.
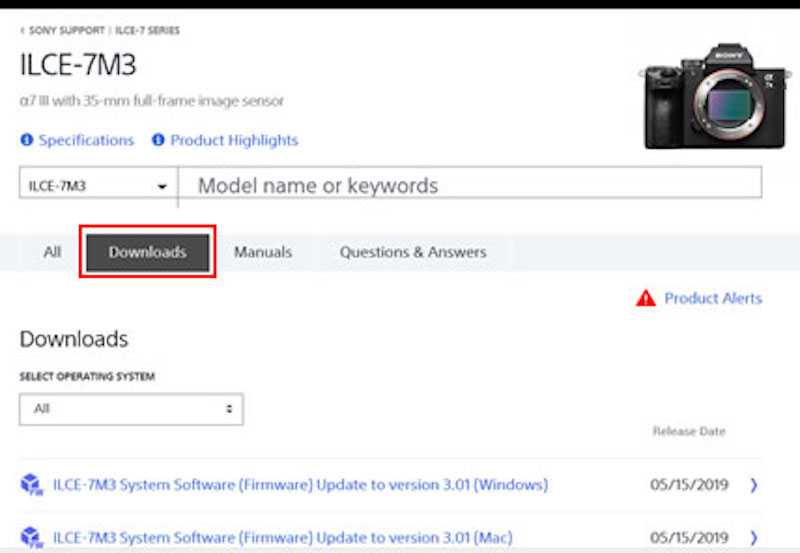
Visit esupport.sony.com
Type in the camera’s model number or use the option “Select your product type” on the screen to get the details for your camera’s specific model number. You can look for this detail on the tag found below your camera if you’re not sure of its model number.
Choose your Camera’s Firmware
Once you arrive on the camera-specific webpage, scroll down and look for the Downloads section. Use the dropdown box to choose your computer’s operating system. After choosing the correct computer operating system, you will see the link to the suitable firmware. Click on the link to your camera’s firmware.
Download the New Firmware Version of your Sony Camera
Click the Download button on the page for System Software Update. Download this software to your PC and remember where you save it.
After the download, look for and double-click the file to begin the System Software Updater.
Set up your Sony Camera for Firmware Update
Turn your camera off and remove its memory card. Don’t connect your PC to your camera first until you’re told to do so.
Switch on the camera and press its Menu button. Choose the toolbox icon for the Setup Menu and verify that the USB connection of the camera is set to Mass Storage.
Connect your camera to your PC with the USB cable that came with it. You can use either the USB C or Micro USB if your camera has both to proceed with the firmware update.
Follow the Instructions to Install Firmware Update of Sony Camera
The window for the Camera System Software Updater will show up on the PC screen after the USB connection is made with the screen of the camera will show the message that reads “Follow computer instructions.”
Follow the instructions on the PC screen to begin the firmware update. Never disconnect the USB cable or power off your camera until you’re done with the update process.
The process might take 10 minutes or more depending on the update’s specific type. Your computer screen will show a status indicator. Click the Finish button on the screen after the update process is finished. Don’t remove the USB cable just yet.
Stop the USB connection after the LCD screen of the camera shows “Camera Update Complete.” Click the icon to remove hardware in the task tray in the bottom right corner of the Windows screen.
Disconnect the USB cable from both the computer and the camera. Follow the directions on the LCD screen of the camera to complete the update. You might need to power off the camera, remove and reinsert its battery, and turn back on the camera again.
Follow the steps above to update your Sony Camera to the latest version of its firmware.