
In Windows 10, System Restore is a feature used to capture a snapshot of a device and save its operating status as a “restore point” when changes are noted in the system. If a critical problem occurs after an update, driver, or application is installed, or if the system settings have been changed incorrectly using the registry or other tool, you can use the restore point to reset the device earlier in order to resolve the problem without losing your valuable files.
While this is a convenient tool for troubleshooting, however, for some strange reasons, System Restore is disabled by default, which means it must be enabled before you or Windows 10 can create restore points.
In this guide, we’ll walk you through the process in setting up System Restore as a device recovery solution in the event of problems that could affect the normal operation of your PC.
How to Enable System Restore in Windows 10
System Restore is not enabled by default in Windows 10, so you need to enable it.
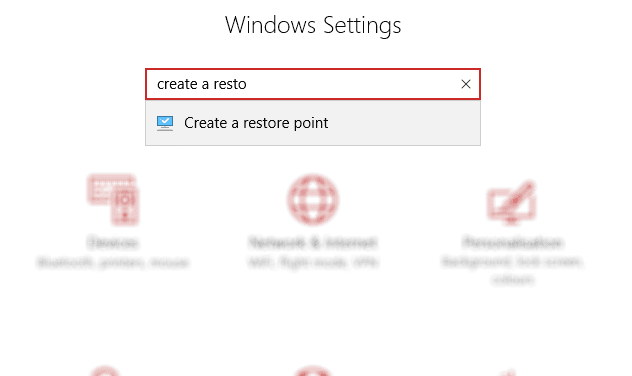
- Enter the Create a restore point in the Cortana search box on the taskbar.
- Select Create a restore point result (Control Panel).
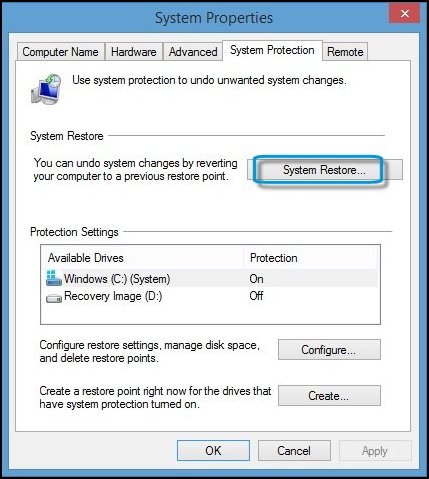
- In the System Properties window, select the drive you want to protect.
- Click the Configure button.
- In the pop-up window, select Turn on system protection. Here you can also set the maximum disk space for System Restore.
- Click Apply.
- Click OK.
- Follow the same steps if you want to protect the second disk.
How to Create a Restore Point in Windows 10
The advantage of System Restore is that Windows automatically creates restore points when major system changes are detected. However, there are cases – for example, before installing a new program – when it is useful to create a restore point manually.
- Click Start and then enter Create a restore point.
- Click on the first result
- On the System Protection tab, click Create.
- You will then be asked to name a restore point – do something descriptive to help you if you need to reset your PC before that point. When finished, click Create.

The system protection software creates a restore point to which you can return later by clicking “System Restore”. If you go through the wizard, your previous state will be restored.
You may need to spend a few minutes checking for effects to reinstall the software and avoid all applications that caused the problem that led you to use the System Restore feature.
How to Use System Restore in Windows 10
To return your computer to the point where it worked much better, follow the following methods:
- Right-click the Start button and select System from the context menu. When the System window appears, click System Protection in the left pane. Finally, when the System Properties window appears, click System Restore.
- The System Restore window opens.
- In the System Restore window, click Next.
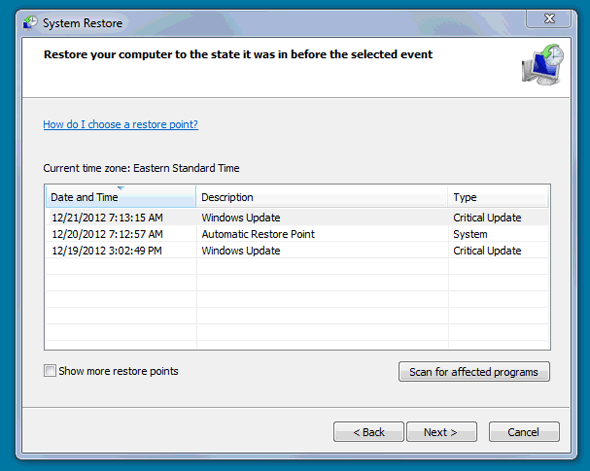
- The system restore point contains a list of available restore points.
- Click on the specified restore point.
- You can see more available restore points by checking Show more restore points.
- Click the Scan for affected programs button to see how the selected restore point affects the programs.
- This is a handy feature that lists the apps you may need to reinstall.
- Click Next to confirm the selected restore point. Then click Done.
Recover from More Serious Windows Errors
Using System Restore to your system won’t always save your PC a lot of trouble, but Windows 10 still has an extra trick that you can take advantage of. It can bring Windows to a whole new state without affecting your documents, even if everything else (including applications) is removed. However, before using this option, just in case, make sure that you have a backup of your important files.
How to Delete Restore Points in Windows 10
You can delete System Restore points to temporarily free up space on your computer. You can delete all restore points or all restore points except the last restore point. You cannot delete all but one restore point after the last one. The available disk space is reused when your computer creates new restore points.
NOTE: When you delete restore points, the computer also deletes previous versions of files.
Deleting All Restore Points
Follow these steps to remove all System Restore points from your computer.
- Save all open files and close all open programs.
- In Windows, search for Restore, and then open Create a restore point in the list of results.
- System properties open when you select the System Protection tab.
- On the System Protection tab, click System Restore to display all current restore points. Then click Next.
- A list of all current restore points is displayed. Make sure that these are the restore points you want to delete, and then click Cancel to close the window.
- On the System Protection tab, click Configure.
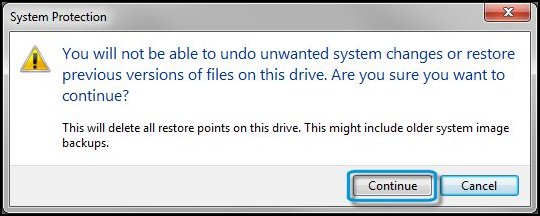
- In the System Protection window, click Delete to delete all restore points from this drive.
- When prompted, click Continue.
Delete all but the last Restore Point
To delete all restore points except the last one, follow the steps below.
- In the taskbar of the desktop screen, click on File Explorer.
- Click on this PC, right-click on the C: drive, then select Properties.
- In the Properties window, click Disk Cleanup.
- In the Disc Cleanup window, click Clean up system files.
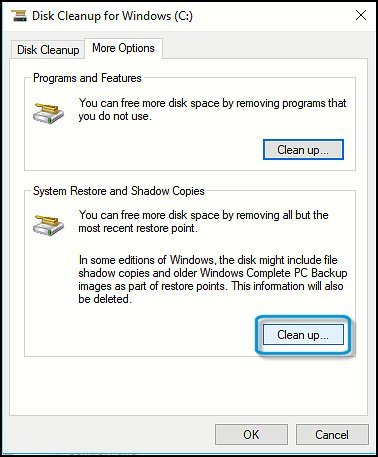
- In the Disc Cleanup window, click the More Options tab, and then click Clean up in the System Restore and Shadow Copies area.
- When prompted, click the Delete button.
NOTE: Once the restore points have been deleted, they cannot be restored.
How to Undo System Changes Using Advanced Startup
If the device does not boot properly and cannot access the desktop, you can use the Advanced startup feature to access System Restore.

Boot into Advanced startup
Before using the System Restore feature, you should familiarize yourself with the steps you need to take to access the Advanced startup environment:
- Turn on your computer.
- When the Windows logo appears on the screen, press the power button to interrupt the startup sequence.
- Repeat steps 1 and 2 twice (or until the device is immersed in the restore process).
- After completing all the steps, you can now access the System Restore function.
Conclusion
Microsoft runs Windows 10 as a service and you must install all Windows updates. This happens automatically behind the scenes. Updating can cause problems with hardware drivers or conflict with software and cause Windows 10 to crash.
So at least make sure that you enable System Restore and Windows will automatically create a restore point before installing updates. You can then easily restore your system to the point where it was running before the update caused problems.
To troubleshoot and fix System Restore errors on Windows 10, browse through the related articles.