
The display on your laptop or desktop computer screen or monitor may not always appear as comfortable as you want it to be. Sometimes, you will see the text blurry or the icons smaller. There are instances when there are elements that come too large.
Windows 11 has a DPI display scaling level that enables you to modify and manage how everything appears on your display monitor screen. DPI means Dots per inch, which indicates the number of pixels on your screen. How you set the scale will influence how everything will look on your display.
You can always change or adjust the DPI display scaling level in your Windows 11 PC. If you set the level too high, it will make all elements larger. At the same time, setting the scaling level to low will make things smaller.
How to Modify and Manage the DPI Display Scaling Level Settings in Windows 11 PC
There are several steps to how you can adjust and override the current DPI display scaling level in your Windows 11 computer. Read each method below and try to follow the steps that are easier for you.
#1 – Change DPI Display Scaling Level in Windows 11 via Settings Menu
- Click the Start button.
- Go to Settings.
- On the left panel, select System.
- Go to the right panel and choose Display.
- Scroll down and go to Scale & layout.
- Select Scale.
- Now, choose the scaling level that you want for your DPI display.
#2 – Change DPI Display Scaling Level in Windows 11 through Registry Editor
- Open the Run Dialog Box. You can also press the Windows key + R.
- Type regedit and hit Enter.
- Navigate to HKEY_CURRENT_USER\Control Panel\Desktop.
- Look for LogPixels and double-click it.
- Under Value Data, you can set it to any number you want.
- 96 = default 100%
- 120 = medium 125%
- 144 = larger 150%
- 192 = extra-large 200%
- 240 = custom 250%
- 288 = custom 300%
- 384 = custom 400%
- 480 = custom 500%
- Go to the Base option and select Decimal.
- Click OK.
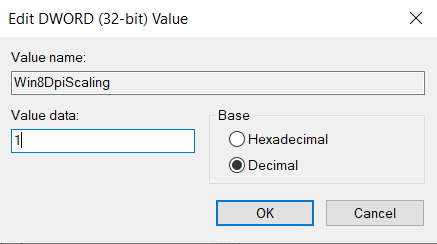
- Next, look for Win8DpiScaling and double-click it.
- Under Value Data, you can enter either 1 or 0. If you set the LogPixels to 96, enter 0. If you set it above 96, use 1.
- Click OK.
- Close the Registry Editor.
- Sign out and sign back in to see the changes.
How to Adjust and Set the Default Custom Scaling Level Settings on Windows 11 Computer
You also have the option to adjust and change the default values on your scaling level settings. If you have a number in mind that is not part of the default selection, you can do the following steps below in order to set it.
- Navigate to the Settings menu.
- Go to System and select Display.
- Select Scale.
- Look for the Custom Scaling option.
- Besides it, you can enter that value that you want for your display scaling level.
- Once done, click the checkmark.
- Select Sign out now.
- Sign back in to see the changes.
Wrapping Up!
Note that your settings may not always work with all the apps on your Windows 11 computer. You can modify it anytime you want to suit your needs.
How do you like your icons and texts to appear on your Windows 11 PC display monitor screen? We are curious to know what you think, so drop us a comment below.
As users demanded more desktop space, the screen resolutions started to go up. So much so, that 100% scaling made some text too small to read. So, then the OS began to use scaling to make everything look bigger but retain that sharpness.