
A built-in camera on your Windows 10 laptop computer is an integral part. You need your web camera for online meetings and other purposes. But, as you launch your webcam on PC, you may encounter an error that will prevent it from starting and working as intended.
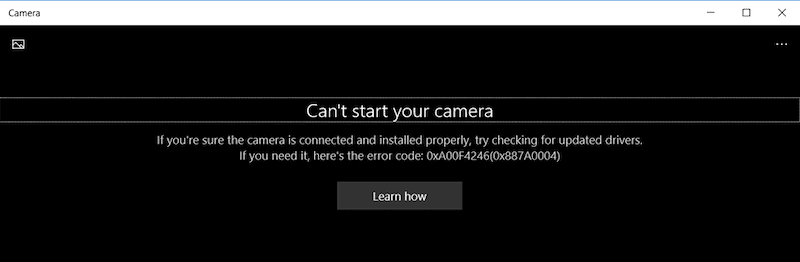
You may see the error message, “Can’t start your camera. If you’re sure that the camera is connected and installed properly, try checking for updated drivers. If you need it, here’s the error code: Error 0xa00f4246 (0x800706BE)“
Many PC users see the 0xa00f4246 (0x800706BE, 0x80040154 or 0x887A0004) issue when they open their webcam to use in video calls and meetings. It can be frustrating if you need to jump on a video conference with your co-workers on Microsoft Teams, Zoom, Google Meet, or Skype and a camera problem blocks your way. If this happens to you, some solutions will help you fix the camera not working error on Windows 10 PC.
How to Fix Windows 10 Camera Not Working with Webcam Error Code 0xa00f4246
Below are some methods that you can try to troubleshoot and fix the webcam error 0xa00f4246 and unblock the system camera on your Windows 10 computer. You can follow each solution one at a time and test if it resolves the issue.
#1 – Restart your Windows 10 PC
A good start in fixing the camera error, or any Windows PC issues for that matter, is to reboot your computer. Exit the camera app and click the Windows Start button. Click the Power button and select Restart. After rebooting, try launching your webcam again.
#2 – Make Sure Apps Have Permissions on Your Webcam
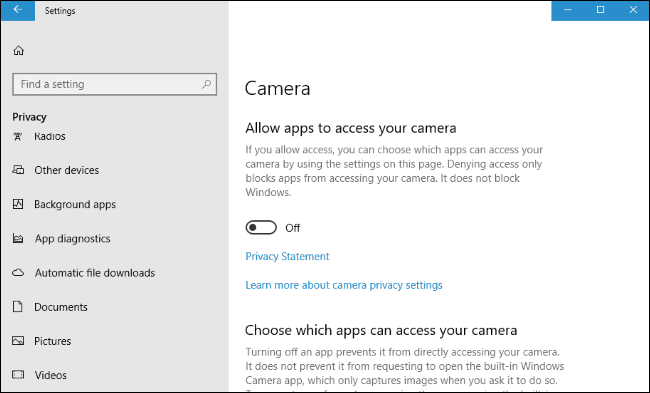
- Launch the Settings menu of your Windows 10 PC.
- Go to Privacy.
- Under Apps Permission, select Camera.
- Look for Allow access to the camera on this device.
- Click the Change button.
- Make sure to turn on Camera access for this device.
- Look for Allow Apps to access your camera.
- Toggle the button to On.
- Go to Choose which Microsoft Store apps can access your camera.
- Look for the Camera and toggle it to On.
- Restart your computer.
#3 – Run PC Hardware Troubleshooter
- Go to the Settings menu.
- Select Update & Security.
- Click Troubleshoot.
- Select Hardware and Devices.
- After applying the fixes, restart your computer.
#4 – Perform an SFC Scan on Windows 10
- Open the Command Prompt.
- Right-click on it and select Run as Administrator.
- Enter the following command: sfc /scannow.
- After the scan, reboot your computer.
#5 – Update your Windows Camera Driver

- Launch Settings menu.
- Select Update & Security.
- Click View optional updates.
- Go to Driver update.
- If there are available updates, click them.
- Click Download and Install.
- Restart your computer.
Are there other ways that you know will help fix the camera error 0xa00f4246? It will greatly help other users to solve their webcam issues as well. Kindly write them down below.