
Running out of space in our Windows 10 computer can give us a lot of stress. In managing our files, we need to delete some of them to give way to new ones. While Windows 10 has the Disk Cleanup utility, it does not work as frequently as we want it.
Now, Windows 10 gives us a new feature called Storage Sense for cleaning up the junk files that can easily pile up.
What is the Storage Sense Feature in Windows 10?
Storage Sense is a new feature introduced by Microsoft a couple of years back on Windows 10. It is set to replace Disk Cleanup as it is being deprecated. Storage Sense automatically scans and deletes temporary files. You don’t have to manually go over all of your files and delete them. When you enable the Storage Sense feature, you will save time and energy.
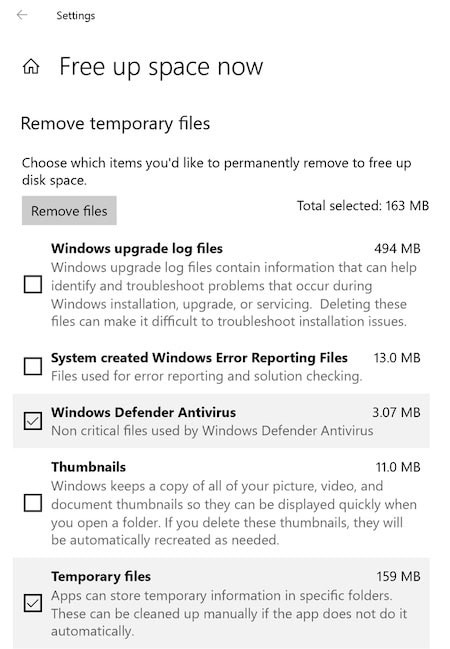
The feature will also monitor your device. In case your computer is running out of storage space, it will start scanning for junk files and delete them to free up space. Sometimes, we forget to permanently delete the files in our Recycle Bin and these files are taking a lot of space. Storage Sense will clean it up for you.
Storage Sense is an optional feature, which means that you will need to manually set it to enable or disable. The reason Microsoft keeps it optional is to give you the choice to clean up and recheck your files first before deleting them temporarily.
How to Enable Storage Sense on Windows 10
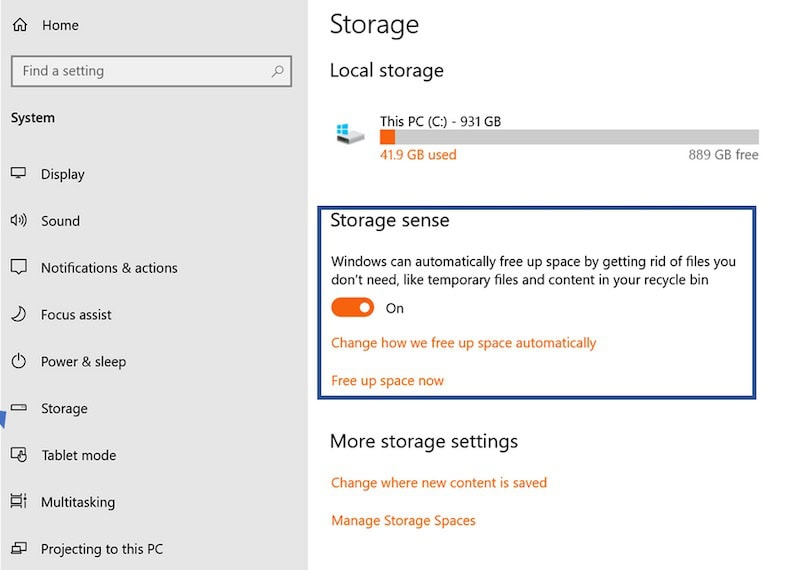
- Click the Start Menu.
- Look for the Settings and click to open.
- Look for the System folder. Click to open.
- Select Storage.
- Look for the Storage Sense.
- Toggle the button under it to Enable or On.
- Now, if you want to disable the Storage Sense, toggle the button to Off.
That’s it! Now, your Windows 10 will do the work for you. Keep in mind that Storage Sense will automatically delete the files when enabled. So, if you are sometimes hesitating to delete your files permanently on your Recycle Bin, you might want to disable the feature. You also need to do a backup in case it tags and delete files that you want to keep.
Do you want to enable the Storage Sense or keep it on disabled mode? Let us know your reasons in the comments below.