
Ever had that moment when your PowerPoint fonts go a little wild? Like they’re wearing disguises or playing hide-and-seek?
We’ve all been there! But don’t worry, we’ve got your font fiasco covered and fix the Microsoft error.

Troubleshoot Installed Fonts Not Displaying Correctly on PowerPoint Error
Today, we’re unraveling why fonts misbehave and showing you the super-easy steps to make them behave again. Let’s get those fonts back in line!
Step 1: Identify the Culprit Fonts on PowerPoint Error
Before diving into solutions, identify which fonts are causing the trouble. Open your PowerPoint presentation and take note of the specific slides or text boxes where the fonts aren’t displaying as expected.
Fonts not displaying correctly in PowerPoint can occur due to a variety of reasons. Here are some common culprits:
- Missing Fonts: If the font you used in your presentation isn’t installed on the computer where you’re viewing it, PowerPoint will attempt to substitute another font. This can lead to unexpected display issues.
- Font Corruption: Fonts can become corrupted during installation or due to issues with your computer’s storage. Corrupted fonts might not render properly, causing display problems.
- Incompatible Fonts: Some fonts might not be compatible with PowerPoint or might not render correctly due to software limitations.
- Font Versions: Different versions of the same font might behave differently. If your presentation was created with a version of the font that’s different from the one on the viewing computer, inconsistencies can arise.
Step 2: Check Font Installation on PowerPoint
Ensure that the problematic fonts are correctly installed on your computer. Sometimes, fonts might not display properly if they’re not installed or if there is an installation error.
- Open the “Control Panel” on Windows or “Font Book” on Mac.
- Look for the font in question. If it’s missing, reinstall it from a trusted source.
Step 3: Restart PowerPoint
Sometimes, all it takes is a simple restart. Close PowerPoint completely and then reopen it. That might refresh the font rendering and fix the display issue.
Step 4: Embed Fonts on PowerPoint

If you share your presentation on a different computer, consider embedding the fonts to ensure consistency.
- Go to “File” > “Options” > “Save” in PowerPoint.
- Check the box that says “Embed fonts in the file.”
- Select the option that suits your needs –embedding all characters or just those used in the presentation.
Step 5: Replace Problematic Fonts
If you’ve determined that a specific font is causing trouble, replace it with a more stable font.
- Select the text box with the problematic font.
- Highlight the text and go to the “Home” tab.
- Choose a different font from the dropdown menu.
Step 6: Clear Font Cache
Clearing the font cache can sometimes resolve font-related issues.
- Close PowerPoint and any other programs using fonts.
- On Windows, search for “Font Settings” in the Start menu.
- Click on “Restore default font settings.” That will clear the font cache.
Step 7: Update PowerPoint Software Version
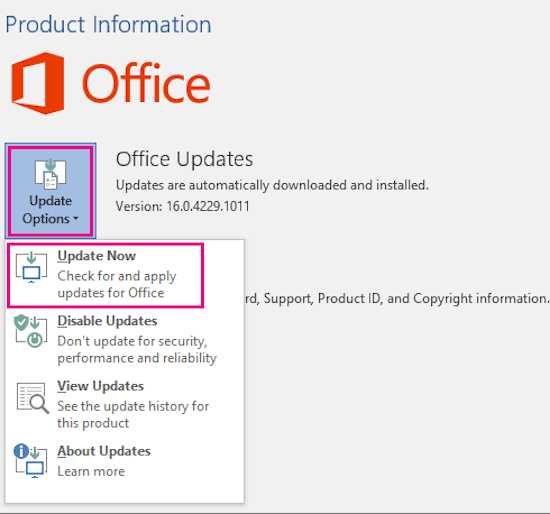
Make sure your PowerPoint software is up-to-date. Sometimes, compatibility issues arise due to outdated software.
- Open PowerPoint.
- Go to “File” > “Account” (or “Help” on older versions).
- Click on “Update Options” and then “Update Now.”
Step 8: Seek Professional Help from Microsoft Customer Support
If the issue persists, it might be more complex. Consider reaching out to PowerPoint support or IT professionals for assistance.
Remember, font troubles happen to the best of us. Following these steps should get your fonts back on track, and your PowerPoint presentation will look polished and professional.