
Updating your Windows 10 PC’s operating system can help improve the overall performance of your computer. You can enjoy new and added features, tightened privacy and security measures, not to mention fixes for bugs and issues from the previous version upgrade. It is ideal to install available updates as they come for you to maximize security features added by Windows to prevent malicious attacks on your PC.
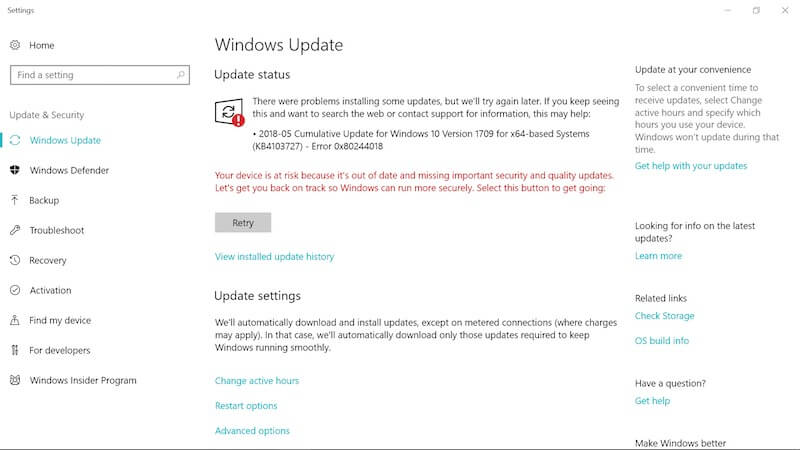
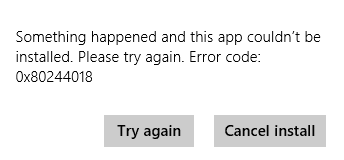
Some users reported that they encounter the error code 0x80244018 after they try to download and install the latest updates on Windows 10 64-bit version. It may seem frustrating, but there are different reasons why your Windows update failed to install after downloading it from Microsoft server. Some users also experience the same problem when downloading and installing apps using the Microsoft Store app on Windows 10 PC. The error message says:
“Something happened and this app couldn’t be installed. Please try again. Error code: 0x80244018”
Possible Causes of Windows 10 Update or Microsoft Store Glitch
- Your PC may have corrupted system files.
- Your VPN is blocking the update.
- Apps are interfering with the update.
Note that there are still other possible reasons and causes as to why you experience the error 0x80244018 when you update your Windows 10 PC or install Microsoft Store apps. Identifying it will help you focus your efforts on how to fix it to proceed with the update.
How to Troubleshoot Error 0x80244018 During Windows 10 Update or MS Store App Install
Whether or not you find out the reason for your Windows 10 update error code 0x80244018, you can try to do the different troubleshooting methods below to help you fix the error. Some of these solutions might also work in fixing issues with installing Microsoft Store apps.
#1 – Disable VPN or Proxy Server on PC
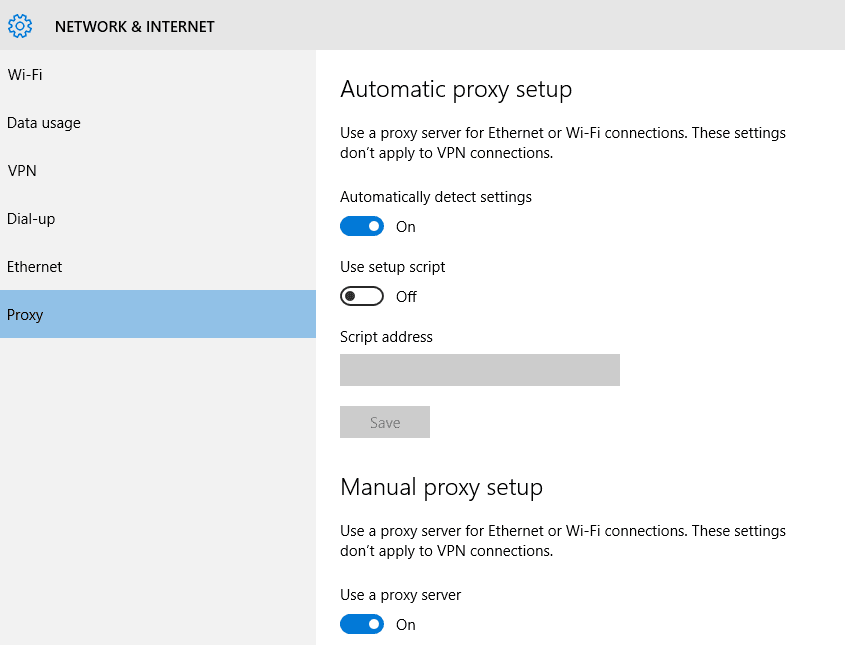
- Launch the Settings menu.
- Select Network & Internet.
- Go to the left-side and click VPN.
- Choose your VPN.
- Click Disconnect.
- To disable the Proxy server, go back to Network & Internet.
- Select Proxy.
- Look for Automatically detect settings and toggle it to on.
- Look for Use a proxy server and toggle it to Off.
#2 – Run Windows Update Troubleshooter
- Open the Settings menu.
- Select Update & Security.
- Click Troubleshoot.
- Look for Windows Update and expand it.
- Click the Run the troubleshooter button.
#3 – Run an SFC Scan
- Open the Command Prompt and run it as administrator.
- Enter the following command: sfc /scannow.
- Wait for the repair process to finish.
#4 – Run a DISM Scan
- Launch the Command Prompt.
- Select Command Prompt (Admin).
- Enter the following commands one at a time:
- DISM /Online /Cleanup-Image /ScanHealth
- DISM /Online /Cleanup-Image /RestoreHealth
#5 – Check the Background Intelligent Transfer Service Setting
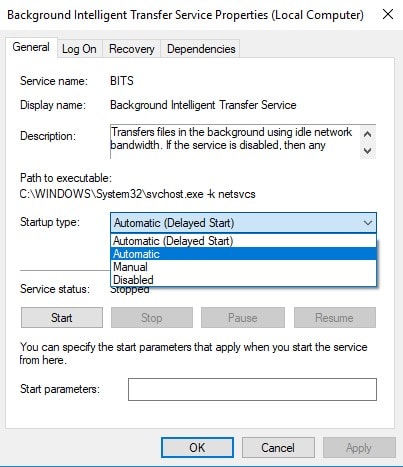
- Open the Windows Search option.
- Enter services and navigate to the Services setting.
- Look for Background Intelligent Transfer Service Setting or BITS.
- Right-click on it and select Properties.
- Go to the General tab.
- Click the Status type under Path to executable.
- Select Automatic (Delayed Start).
- Go to Service Status.
- Choose Running.
- Click OK.
- Click Apply.
#6 – Create an AppReadiness Folder
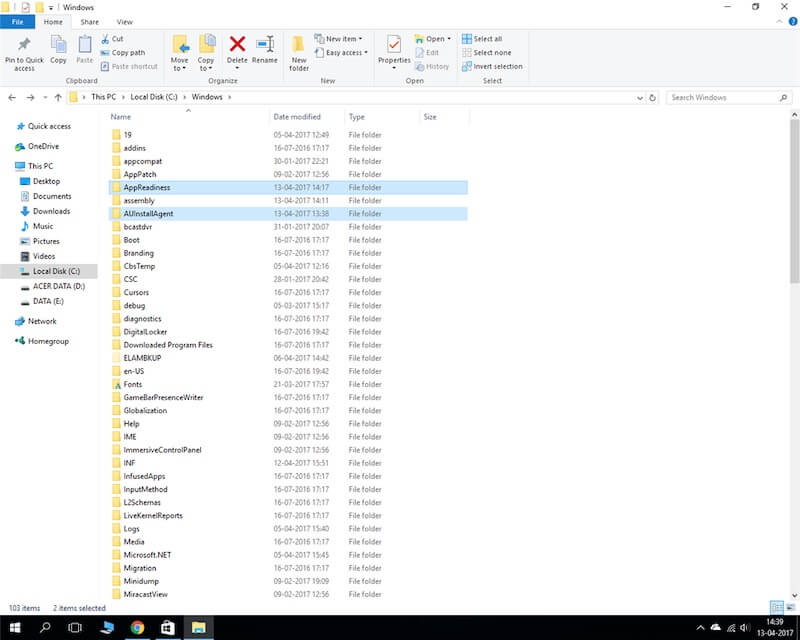
- Launch ThisPC on your Windows 10.
- Go to the View tab on the top of the screen.
- Make sure to show all hidden items by marking the Hidden Items option.
- Select Options.
- Choose Change folder and change options.
- Go to the View tab.
- Look for Hide protected operating system files (Recommended) and uncheck the box.
- Click OK.
- Open the C:\Windows.
- On an empty space, right-click on it.
- Select New.
- Click Folder.
- Enter the name AUInstallAgent.
- Restart your computer.
- If the error remains, go back to C:\Windows.
- Create a new folder.
- Enter the name AppReadiness.
- Restart your computer.
#7 – Reset the Windows Update Components
- Launch the Command Prompt with admin rights.
- Enter the following command one at a time. Make sure to hit Enter after typing each command below.
net stop wuauserv
net stop cryptSvc
net stop bits
net stop msiserver
ren C:\Windows\SoftwareDistribution SoftwareDistribution.old
ren C:\Windows\System32\catroot2 catroot2.old
net start wuauserv
net start cryptSvc
net start bits
net start msiserver
- Restart your computer.
Did any of the solutions above work for you? Which one did? You can let us know so other users can benefit from your experience as well. Please write them down below.