
A lot of people are using the Panasonic Smart TV to stream movies and shows online on their TV screens. You can download and install apps that will allow you to play games, watch movies and videos, and even surf the world wide web. To do all these things, you need to connect your smart TV to a reliable Internet connection.
However, some users complained that their Panasonic smart TV is not connecting to the Internet. When they try to connect to a WiFi connection, they see the network error code 006, 007, or 008. This problem may be an issue with your network connection. In most cases, the error codes appear when there are wrong data entered in the Proxy settings.
Fixing Panasonic Smart TV Not Connecting to WiFi Internet Network
If you are experiencing any of the network error code 006, 007, or 008 on your Panasonic smart TV, there are ways on how you can fix the problem. Follow each solution below one at a time and check if the error still exists.
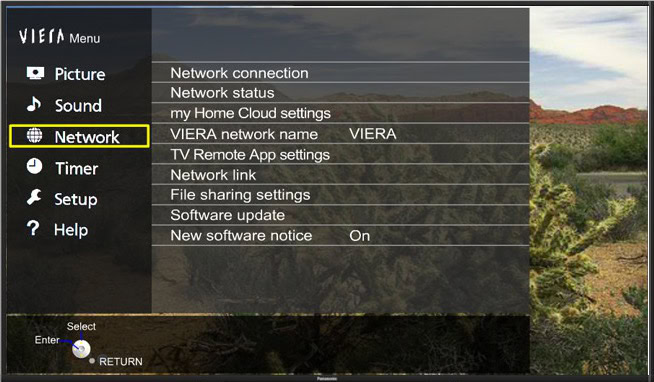
#1 – Run a Network Connection Test on your Panasonic TV

- On your remote control, press the Menu button.
- Go to Network.
- Click Network Status.
- Now, run a connection test.
- When done, press the Return button on your remote.
- Navigate to the IP/DNS settings.
- Check the IP and DNS Settings. Make sure that the entries are set to Auto.
- Press the Return button.
- Run a connection test again.
#2 – Check Your Router Settings
- On your remote, press the Menu button.
- Select Network.
- Go to Network Connection.
- After scanning for WiFi connections, click Next.
- Select your router and press the OK button.
- When you open the router setting, check the DHCP, and turn it on. Do the same with the UPnP.
- Once done, press the OK button.
#3 – Check the Proxy Settings
Sometimes, routers add numeric numbers on the Proxy Settings of your smart TV. It then causes an error in the network connection.
- Press the Menu button.
- Click Network.
- Navigate to Network Status.
- Select Status Details.
- Look for the Proxy field.
- If there is an entry in the field, click Custom setup. Make sure also that the Proxy port is 0.
- Highlight the proxy filed.
- Press the Blue button to delete the entry. There should be no entry on the Proxy field.
- Press the Return button on your remote to save.
If none of the solutions above work for you, contact your Internet Service Provider. Was the article helpful? Let us know in the comments below.
Fantastic it worked very greatful
Super! It worked!
Didn’t work. Couldn’t highlight anything in the settings to change anything. Blue button did nothing